SpringBoot-shiro
- ApacheShiro是Java 的一个安全(权限)框架。
- Shiro可以非常容易的开发出足够好的应用,其不仅可以用在JavaSE环境,也可以用在JavaEE环境。
- Shiro可以完成:认证、授权、加密、会话管理、与Web 集成、缓存等。
- 下载:http://shiro.apache.org/
1.框架核心功能
- Authentication:身份认证/登录,验证用户是不是拥有相应的身份;
- Authorization:授权,即权限验证,验证某个已认证的用户是否拥有某个权限;即判断用户是否能进行什么操作,如:验证某个用户是否拥有某个角色。或者细粒度的验证某个用户对某个资源是否具有某个权限;
- Session Manager:会话管理,即用户登录后就是一次会话,在没有退出之前,它的所有信息都在会话中;会话可以是普通JavaSE环境,也可以是Web 环境的;
- Cryptography:加密,保护数据的安全性,如密码加密存储到数据库,而不是明文存储;
- Web Support:Web 支持,可以非常容易的集成到Web 环境;
- Caching:缓存,比如用户登录后,其用户信息、拥有的角色/权限不必每次去查,这样可以提高效率;
- Concurrency:Shiro支持多线程应用的并发验证,即如在一个线程中开启另一个线程,能 把权限自动传播过去;
- Testing:提供测试支持;
- Run As:允许一个用户假装为另一个用户(如果他们允许)的身份进行访问;
- Remember Me:记住我,这个是非常常见的功能,即一次登录后,下次再来的话不用登录了
2.shiro框架(应用)
- Application Code:应用程序代码,由开发人员负责开发的。
- Subject:应用代码直接交互的对象是Subject,也就是说Shiro的对外API 核心就是Subject。Subject 代表了当前“用户”,这个用户不一定是一个具体的人,与当前应用交互的任何东西都是Subject,如网络爬虫,机器人等;与Subject 的所有交互都会委托给SecurityManager;Subject 其实是一个门面,SecurityManager才是实际的执行者;
- SecurityManager:安全管理器;即所有与安全有关的操作都会与SecurityManager交互;且其管理着所有Subject;可以看出它是Shiro的核心,它负责与Shiro的其他组件进行交互,它相当于SpringMVC中DispatcherServlet的角色
- Realm:Shiro从Realm 获取安全数据(如用户、角色、权限),就是说SecurityManager要验证用户身份,那么它需要从Realm 获取相应的用户进行比较以确定用户身份是否合法;也需要从Realm 得到用户相应的角色/权限进行验证用户是否能进行操作;可以把Realm 看成DataSource
3.shiro架构(内部)
- Subject:任何可以与应用交互的“用户”;
- SecurityManager:相当于SpringMVC中的DispatcherServlet;是Shiro的心脏;所有具体的交互都通过SecurityManager进行控制;它管理着所有Subject、且负责进行认证、授权、会话及缓存的管理。
- Authenticator:负责Subject 认证,是一个扩展点,可以自定义实现;可以使用认证策略(Authentication Strategy),即什么情况下算用户认证通过了;
- Authorizer:授权器、即访问控制器,用来决定主体是否有权限进行相应的操作;即控制着用户能访问应用中的哪些功能;
- Realm:可以有1 个或多个Realm,可以认为是安全实体数据源,即用于获取安全实体的;可以是JDBC 实现,也可以是内存实现等等;由用户提供;所以一般在应用中都需要实现自己的Realm;
- SessionManager:管理Session 生命周期的组件;而Shiro并不仅仅可以用在Web 环境,也可以用在如普通的JavaSE环境
- CacheManager:缓存控制器,来管理如用户、角色、权限等的缓存的;因为这些数据基本上很少改变,放到缓存中后可以提高访问的性能
- Cryptography:密码模块,Shiro提高了一些常见的加密组件用于如密码加密/解密。
4. springboot集成shiro
shiro没有springboot的start,因而只能手动进行各种配置
4.1 导入依赖
    <dependency>
        <groupId>org.apache.shiro</groupId>
        <artifactId>shiro-core</artifactId>
        <version>${shiro.version}</version>
    </dependency>
    <dependency>
        <groupId>org.apache.shiro</groupId>
        <artifactId>shiro-spring</artifactId>
        <version>${shiro.version}</version>
    </dependency>
4.2 配置DelegatingFilterProxy
过滤器代理类(DelegatingFilterProxy)的作用就是代理Filter,通过它的代理可以让spring容器来管理Filter的生命周期,并且可以通过spring注入的形式,来代理一个Filter的执行。shiro和springSecurity都是使用了这个类。
使用它的好处是什么呢,filter是比bean先加载的,如果filter中使用到spring容器中的bean的话,将无法进行注入。而使用代理类,代理类先创建,而真正的处理bean是在spring容器初始化时创建的,因而bean内可以使用容器中的bean。
4.2.1 代理原理
它实现了Filter接口,在一般的web项目中会按照Filter配置在web.xml中
    <filter>
        <filter-name>shiroFilter</filter-name>
        <filter-class>org.springframework.web.filter.DelegatingFilterProxy</filter-class>
        <init-param>
            <!-- 这个让spring来进行filter的生命周期管理-->
            <param-name>targetFilterLifecycle</param-name>
            <param-value>true</param-value>
        </init-param>
    </filter>
    <filter-mapping>
        <filter-name>shiroFilter</filter-name>
        <url-pattern>/*</url-pattern>
    </filter-mapping>
它的作用是会在spring容器中找到一个与
名称(shiroFilter)一致的filter来进行代理。 为什么会根据
来查找Filter呢,我们来大致看一下这个类的源码,这个类的继承结构图如下:
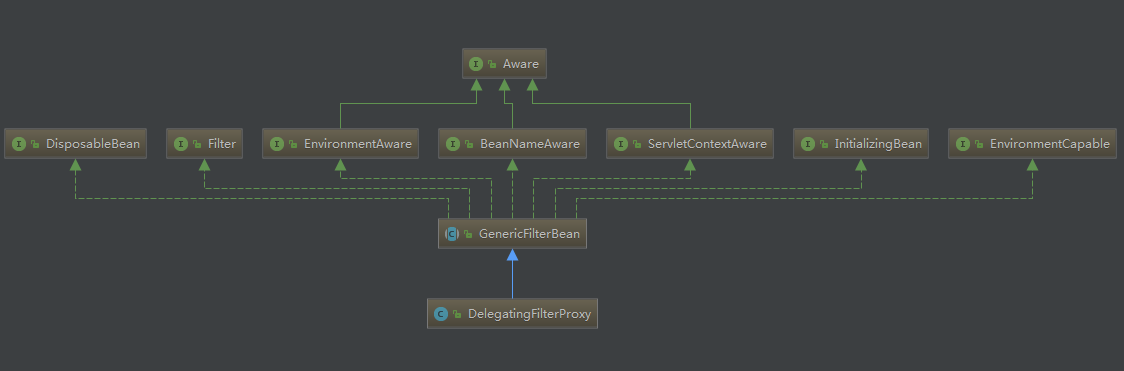
它继承了ServletContextAware接口,这使得spring容器在创建这个类的对象时会自动注入servlet容器对象,通过这个对象就可以获得WebApplicationContext对象。通过springweb容器对象即可在容器中查找对应名称的Filter,那么这个名称是怎么获取的呢。
@Override
	protected void initFilterBean() throws ServletException {
		synchronized (this.delegateMonitor) {
            //如果代理Filter是空对象则进行查找
			if (this.delegate == null) {
				// 如果targetBeanName是空,则获取FilterName作为targetBeanName
				if (this.targetBeanName == null) {
                    //此步getFilterName是从FilterConfig里获取filtername
					this.targetBeanName = getFilterName();
				}
				//这里通过serveletContext获取到了springweb容器
				WebApplicationContext wac = findWebApplicationContext();
				if (wac != null) {
                    //然后在web容器中获取对应的Filter,下面再看看是如何获取的。
					this.delegate = initDelegate(wac);
				}
			}
		}
	}
protected Filter initDelegate(WebApplicationContext wac) throws ServletException {
		String targetBeanName = getTargetBeanName();
		Assert.state(targetBeanName != null, "No target bean name set");
    	//利用targetBeanName在容器中获取。
		Filter delegate = wac.getBean(targetBeanName, Filter.class);
    	//这里调用了初始化方法,判断了TargetFilterLifecycle属性
		if (isTargetFilterLifecycle()) {
			delegate.init(getFilterConfig());
		}
		return delegate;
	}
从上述代码可以看出,在初始化FilterBean时会看targetBeanName属性是否为空,如果不为空,就使用这个名称去获取Filter,如果为空就从FilterConfig配置里获取FilterName再通过这个名称去获取Filter。这些操作的前提是delegate对象(被代理的Filter)为空。
从源码来看DelegatingFilterProxy还有一个构造器可以直接传入delegate,如果直接传入就不会再去查找了。(未做尝试)
DelegatingFilterProxy拦截时执行的代码如下:
@Override
	public void doFilter(ServletRequest request, ServletResponse response, FilterChain filterChain)
			throws ServletException, IOException {

		// 前面进行判断当Delegate对象不存在时去容器中寻找。
		Filter delegateToUse = this.delegate;
		if (delegateToUse == null) {
			synchronized (this.delegateMonitor) {
				delegateToUse = this.delegate;
				if (delegateToUse == null) {
					WebApplicationContext wac = findWebApplicationContext();
					if (wac == null) {
						throw new IllegalStateException("No WebApplicationContext found: " +
								"no ContextLoaderListener or DispatcherServlet registered?");
					}
					delegateToUse = initDelegate(wac);
				}
				this.delegate = delegateToUse;
			}
		}

		// 此处调用了Delegate对象的doFilter方法。
		invokeDelegate(delegateToUse, request, response, filterChain);
	}
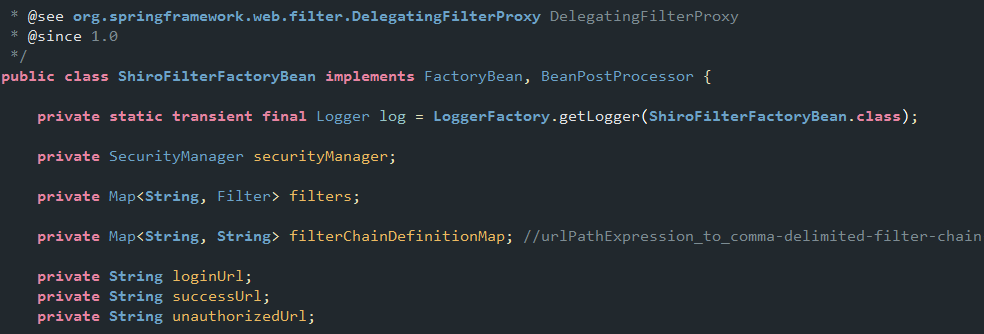
可以看出DelegatingFilterProxy代理类真正的执行对象就是delegate,因此我们需要给容器中配置一个delegate对象,这个Filter对象的名字默认就是“shiroFilter”,对于shiro来说这个对象就是 ShiroFilterFactoryBean 对象的getObject()的返回值。
4.2.2 基于springboot的配置
在springboot中如果使用内置servlet容器则没有web.xml,那么DelegatingFilterProxy对象是如何配置的呢。
/**
     * shiro安全框架必须的拦截器,它只是一个代理,会根据targetBeanName(shiroFilter)在spring容器中查	 * 找Bean
     * 并把所有的Filter操作委托给这个bean操作。即实际起作用的对象是shiroFilter
     * @return
     */
    @Bean
    public FilterRegistrationBean shiroFilterRegistrationBean(){
        FilterRegistrationBean registration = new FilterRegistrationBean();
        registration.setFilter(new DelegatingFilterProxy("shiroFilter"));
        registration.setEnabled(true);
        registration.setOrder(Integer.MAX_VALUE - 1);
        registration.addUrlPatterns("/*");
        return registration;

    }
通过FilterRegistrationBean对象将DelegatingFilterProxy对象注入spring容器中,并设置Filter的属性。
4.3 创建ShiroFilterFactoryBean
4.3.1 创建原理
DelegatingFilterProxy对象代理的是Filter,为什么要创建 ShiroFilterFactoryBean 呢,我们仍旧看看ShiroFilterFactoryBean 类是怎么实现的。
该类实现了FactoryBean接口,这个接口是spring提供的利用工厂模式创建bean的接口,当通过容器获取这个对象时,实际上是获取了这个接口的getObject()方法返回的对象。
public Object getObject() throws Exception {
        if (this.instance == null) {
            this.instance = this.createInstance();
        }
        return this.instance;
    }
protected AbstractShiroFilter createInstance() throws Exception {
    log.debug("Creating Shiro Filter instance.");
    SecurityManager securityManager = this.getSecurityManager();
    String msg;
    if (securityManager == null) {
        msg = "SecurityManager property must be set.";
        throw new BeanInitializationException(msg);
    } else if (!(securityManager instanceof WebSecurityManager)) {
        msg = "The security manager does not implement the WebSecurityManager interface.";
        throw new BeanInitializationException(msg);
    } else {
        FilterChainManager manager = this.createFilterChainManager();
        PathMatchingFilterChainResolver chainResolver = new PathMatchingFilterChainResolver();
        chainResolver.setFilterChainManager(manager);
        return new ShiroFilterFactoryBean.SpringShiroFilter((WebSecurityManager)securityManager, chainResolver);
    }
}
通过源码可以看出最终获取的是SpringShiroFilter对象。这个对象创建时需要传入securityManager,和chainResolver(FilterChain解析对象)。chainResolver中包含了FilterChainManager(过滤器链管理对象),这是个接口,实现类是DefaultFilterChainManager,对象内部维护了shiro默认的过滤器
new DefaultFilterChainManager()

    public DefaultFilterChainManager() {
        this.filters = new LinkedHashMap<String, Filter>();
        this.filterChains = new LinkedHashMap<String, NamedFilterList>();
    	//这里将默认的shiroFilter添加到 this.filters中
        addDefaultFilters(false);
    }
/**
* DefaultFilter 枚举类,存储了默认的Filter
*/
protected void addDefaultFilters(boolean init) {
    //遍历添加枚举类中的Filter
        for (DefaultFilter defaultFilter : DefaultFilter.values()) {
            addFilter(defaultFilter.name(), defaultFilter.newInstance(), init, false);
        }
    }
4.3.2 如何创建
在创建ShiroFilterFactoryBean有几个前置bean需要先被创建出来,一个是SecurityManager,一个是Realm
org.apache.shiro.mgt.SecurityManager是一个接口,我们一般使用它的默认实现类 org.apache.shiro.web.mgt.DefaultWebSecurityManager。
在securityManager中需要传入一个Realm用来实现我们自己定义的登录效验逻辑。
Realm接口我们一般使用的实现类是 org.apache.shiro.realm.AuthenticatingRealm。
下面我们先来实现自己的Realm
4.3.2.1 实现自定义Realm
Realm可以通过CredentialsMatcher属性来执行密码的比对。通过自定义的CredentialsMatcher,可以实现我们自己的密码比对方式。
通过ByteSource可以给密码比对添加盐值,是密码更加安全
ByteSource credentialsSalt = ByteSource.Util.bytes(principal);
return new SimpleAuthenticationInfo(principal,"0192023a7bbd73250516f069df18b500",credentialsSalt,getName());
自定义实现realm可以通过继承shiro已有的抽象类来完成 AuthenticatingRealm、AuthorizingRealm。
其中 AuthenticatingRealm抽象类需实现doGetAuthenticationInfo这个方法,这个方法是用来重写验证身份逻辑的。AuthorizingRealm抽象类则需要额外实现一个doGetAuthorizationInfo,这个方法是用来获取权限的。根据需求的不同,选择不同的抽象类来进行实现。一般后台管理系统都是需要权限效验的,而前台用户页面基本上只效验登录身份即可。
package cn.com.pansky.shirodemo.shiro;

import org.apache.shiro.authc.*;
import org.apache.shiro.realm.AuthenticatingRealm;
import org.springframework.stereotype.Component;

/**
 * 描述:
 * 自定义realm
 *
 * @author Xue_Pan
 * @create 2019-01-31 10:09
 */
@Component
public class ShiroRealm extends AuthorizingRealm {

    @Override
    protected AuthenticationInfo doGetAuthenticationInfo(AuthenticationToken token) throws AuthenticationException {
        UsernamePasswordToken usernamePasswordToken = (UsernamePasswordToken) token;
        String principal = (String)usernamePasswordToken.getPrincipal();
        if(!"admin".equals(principal)){
            throw new UnknownAccountException("用户名密码错误");
        }
        return new SimpleAuthenticationInfo(principal,"123",getName());
    }

    /**
     * 授权(验证权限时调用)
     */
    @Override
    protected AuthorizationInfo doGetAuthorizationInfo(PrincipalCollection principals) {
        //这里获取的是登录时传递的principal。
        SysUserEntity user = (SysUserEntity) principals.getPrimaryPrincipal();
        Long userId = user.getUserId();
		//然后从数据库或者缓存中获取用户的权限。
        List<String> permsList;
        //用户权限列表
        Set<String> permsSet = new HashSet<>();
       	....
        SimpleAuthorizationInfo info = new SimpleAuthorizationInfo();
        info.setStringPermissions(permsSet);
        return info;
    }
}
/**
     * 注入安全管理器
     * @return
     */
    @Bean
    public SecurityManager securityManager(ShiroRealm shiroRealm){
        DefaultWebSecurityManager securityManager = new DefaultWebSecurityManager();
        HashedCredentialsMatcher credentialsMatcher = new HashedCredentialsMatcher();
        //指定加密算法
        credentialsMatcher.setHashAlgorithmName("MD5");
        //指定加密的次数
        credentialsMatcher.setHashIterations(1);
        shiroRealm.setCredentialsMatcher(credentialsMatcher);
        securityManager.setRealm(shiroRealm);
        return securityManager;

    }

    @Bean
    public ShiroFilterFactoryBean shiroFilter(SecurityManager securityManager){
        ShiroFilterFactoryBean shiroFilter = new ShiroFilterFactoryBean();
        shiroFilter.setSecurityManager(securityManager);
        return shiroFilter;
    }
文档信息
- 本文作者:chayedankase
- 本文链接:https://chayedankase.github.io/2018/11/11/SpringBoot-shiro/
- 版权声明:自由转载-非商用-非衍生-保持署名(创意共享3.0许可证)