SSO-CAS
SSO 单点登录,是指在多个应用系统中,用户只需一次登录就可以访问所有相互信任的系统。
1.SSO原理
学习SSO原理的前提是要了解WEB的会话机制,也就是三次握手。
1.1 浏览器的会话机制
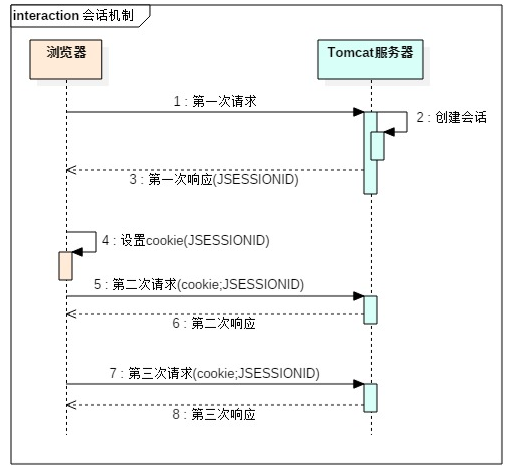
第一次浏览器向服务器发送请求,服务器接收到请求后会创建session,并将sessionid返回。
浏览器接收到sessionid后将它保存在本地cooki中。
第二次、第三次握手均会附带sessionid,而浏览器每次通过sessionid来区分到底正在与那个浏览器在进行交互。
1.2 登录机制
下面我们看看浏览器的登录是怎么回事。
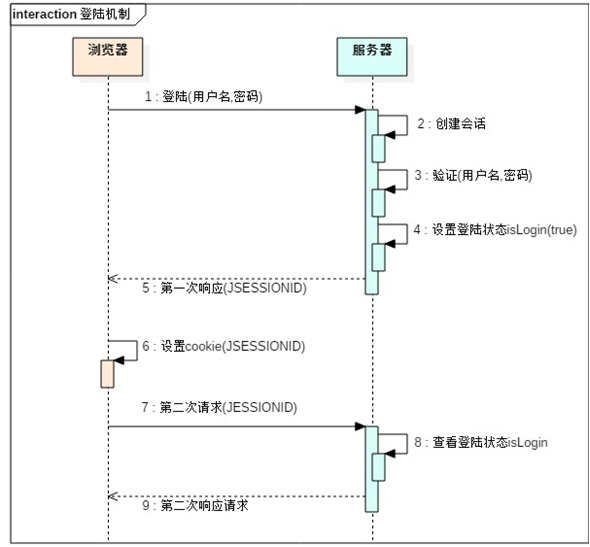
浏览器登录时会向服务器发送用户名,密码。服务器接收到请求后创建session,并对用户名密码进行验证,如果验证通过则在session中设置登录状态为真,并将sessionid返回。
浏览器下次请求附带sessionid,服务器会判断对应的session是否是登录状态,如果是的话就允许进行登录后的操作。
1.3 SSO的出现
随着业务系统的增多,每个系统都需要登录,相同的操作需要多次进行。SSO就是为了解决这个问题。
能否一次登录后保存了cooki,所有的系统都可以使用呢。cooki有域的限制,即不同的域名之间的cooki根本无法串通使用。
既然这样,为什么不将web应用群中所有子系统的域名统一在一个顶级域名下,例如“*.baidu.com”,然后将它们的cookie域设置为“baidu.com”,这种做法理论上是可以的,甚至早期很多多系统登录就采用这种同域名共享cookie的方式。
然而,可行并不代表好,共享cookie的方式存在众多局限。首先,应用群域名得统一;其次,应用群各系统使用的技术(至少是web服务器)要相同,不然cookie的key值(tomcat为JSESSIONID)不同,无法维持会话,共享cookie的方式是无法实现跨语言技术平台登录的,比如java、php、.net系统之间;第三,cookie本身不安全。
因此,我们需要一种全新的登录方式来实现多系统应用群的登录,这就是单点登录
1.4 单点登录
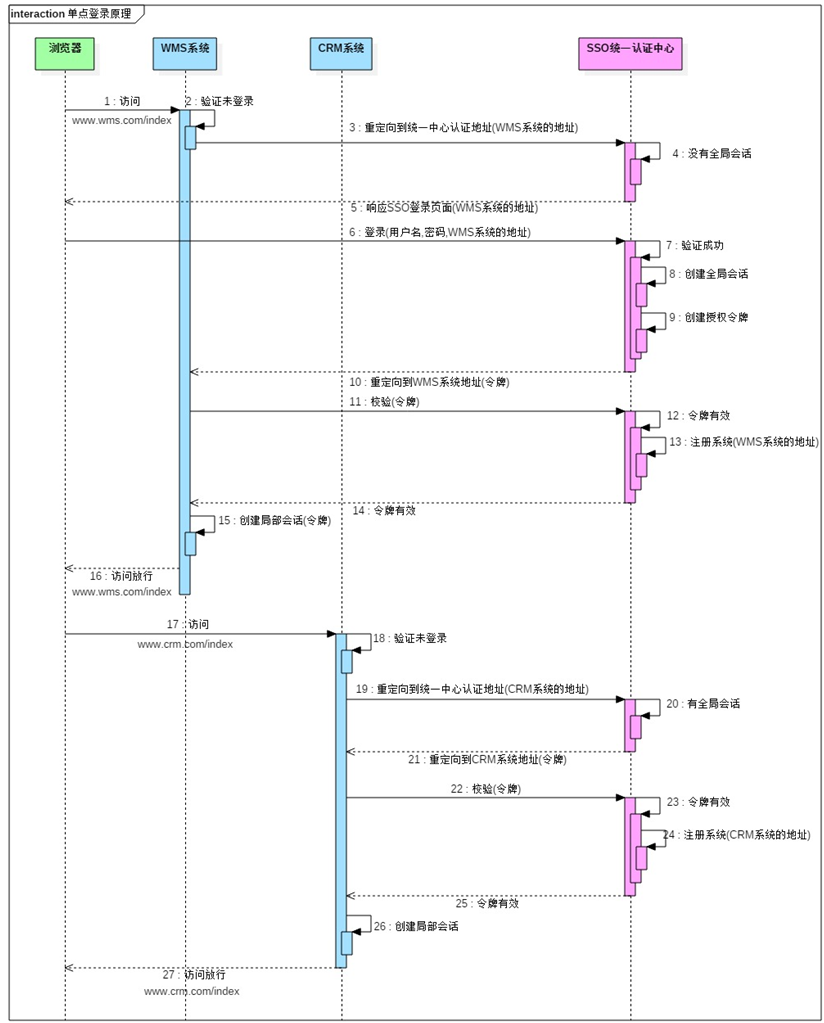
如上图浏览器发送请求访问 wms系统,wms服务器进行验证,发现没有登录,就会将请求重定向到sso认证中心,并且在请求中添加浏览器访问wms的地址比如 https://www.sso.com:8443/cas/login?server=www.wms.com/index;
sso认证中心获取到重定向请求后会进行效验看是否登录(看看cooki中是否携带认证信息,注: 这个cooki是sso的cooki),如果没有登录则会向浏览器返回登录页面。
浏览器通过登录页面登录,登录时除了提交表单信息外还会附带第一次访问的wms地址。
sso认证中心对请求进行认证,认证通过后会创建会话并给浏览器返回认证信息,浏览器将认证信息保存在cooki中(对应sso的域的cooki)。同时还会重定向让浏览器按照wms的地址发送令牌,wms服务器拿到令牌后会再去认证中心进行确认,sso验证令牌有效,则会将wms地址注册进sso系统中表示已知在wms系统上登录了,同时给wms返回认证有效的结果。
wms系统获取到认证有效,则会在系统内创建登录成功回话,并返回浏览器,浏览器将sessionid保存到cooki中(wms域的cooki)。
至此wms登录成功。下面我们再看同样的crm访问流程。
浏览器访问crm系统,crm系统进行验证,发现没有登录,仍旧将请求重定向到sso,当访问sso时,由于wms登录时在sso域的cooki中有认证信息,所以重定向是sso会直接验证认证信息,发现认证信息正确,就会给浏览器返回认证信息,并重定向到crm。crm获取认证信息后回去sso进行确认,sso确认令牌有效,并将crm注册进系统内,然后给crm返回登录有效。
crm会创建登录成功会话,并返回浏览器访问的网页,浏览器登录crm系统成功,期间并不用输入验证信息,而是通过sso域中的cooki来进行效验。
这就是单点登录的原理。
1.5 单点登出
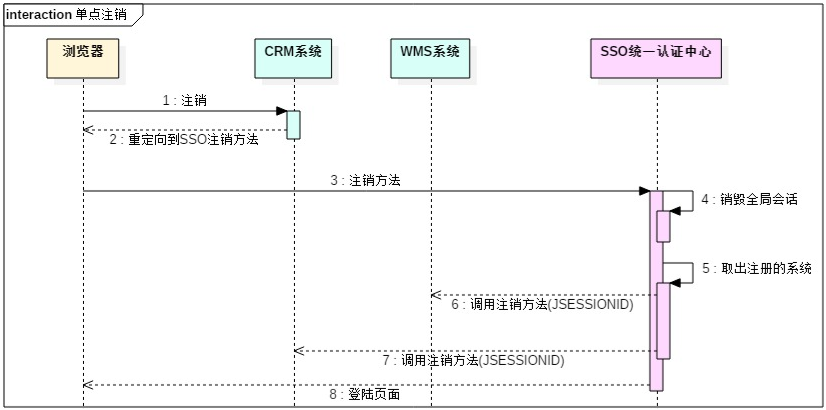
浏览器向crm发出退出请求,crm将请求重定向到sso的退出方法上,sso接收到请求后销毁会话,并取出注册的地址遍历调用地址的退出地址,从而注册的所有系统都的session都会被销毁,完成单点退出效果。
2. 基于CAS的单点登录(5.3.6)
cas是什么大家可以去百度,下面我们一步一步完成基于5.3.6的CAS单点登录的搭建
2.1 自定义安全证书
cas的核心登录效验是基于https,因而首先需要https的安全证书,可以去淘宝购买。这里我们自己练习用,就自己生成吧,当然了,要是不想使用https,也是可以的添加这俩配置就行了。配置的位置,后面会说到。
cas.tgc.secure=false
cas.serviceRegistry.initFromJson=true
2.1.1 生成keystore 密匙文件
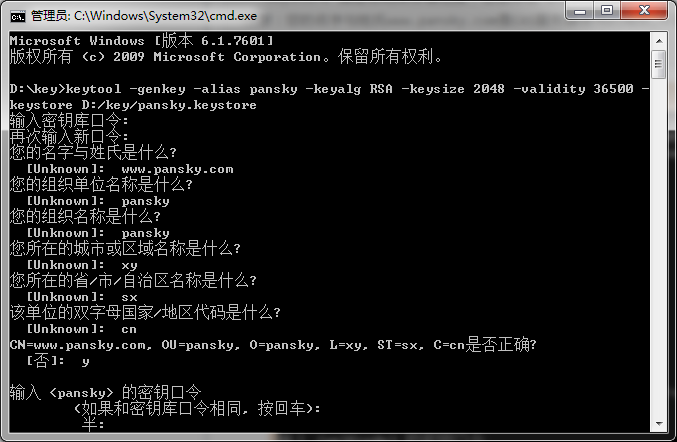
首先利用java jdk的keytool 工具生成服务器的密匙文件 *.keystore
命令: keytool -genkey -alias pansky -keyalg RSA -keysize 2048 -validity 36500 -keystore D:/key/pansky.keystore
参数说明:
-genkey 生成密钥
-keyalg 指定密钥算法,这时指定RSA,
-keysize 指定密钥长度,默认是1024位,这里指定2048,长一点,比较难破解,
-validity 指定证书有效期,这里指定36500天.
-alias 指定别名,这里是pansky
-keystore 指定密钥库存储位置,这里存在 D:/keys/目录下 注意:您的名字与姓氏www.pansky.com是CAS服务器使用的域名,不是随便乱定的,其他的随意. 应该与你的服务器域名一致
2.1.2 通过密匙文件导出证书
通过keytool执行如下命令
命令:keytool -export -alias pansky -storepass 123456 -file D:/key/pansky.cer -keystore D:/key/pansky.keystore
参数说明:
-alias指定别名为pansky;
-storepass指定私钥为123456;
-file指定导出证书的文件名为pansky.cer;
-keystore 指定之前生成的密钥文件的文件。
注意:-alias和-storepass必须为生成pansky.keystore密钥文件时所指定的别名和密码,否则证书导出失败.

2.1.3 将证书导入到jdk信任库
执行如下命令 命令:keytool -import -alias pansky -keystore C:/”Program Files”/Java/jdk1.8.0_144/jre/lib/security/cacerts -file D:/key/pansky.cer -trustcacerts
查询证书库内的证书
keytool -list -keystore C:/"Program Files"/Java/jdk1.8.0_144/jre/lib/security/cacerts

删除一个指定别名的证书
keytool -delete -alias 别名 -keystore  C:/"Program Files"/Java/jdk1.8.0_144/jre/lib/security/cacerts
注意:1.如果路径有空格或特殊字符,像上面一样加上引号.
2. 要求输入的密匙 是jdk默认 changeit 而不是自己定义的证书的密匙
至此我们完成了自定义安全证书的生成。

2.2 使用cas-overlay-template完成服务器搭建
CAS官网推荐使用cas-overlay-template来完成服务器的搭建。
overlay 是maven的一种引入方式,它可以将两个war包在编译时打包成一个,如果有重名文件,在打包时主项目会覆盖其他项目中的文件。
相当于cas-overlay-template为我们写好了大部分内容,其余需要定制的内容,我们可以将文件复制后进行修改,打包时会自动覆盖。
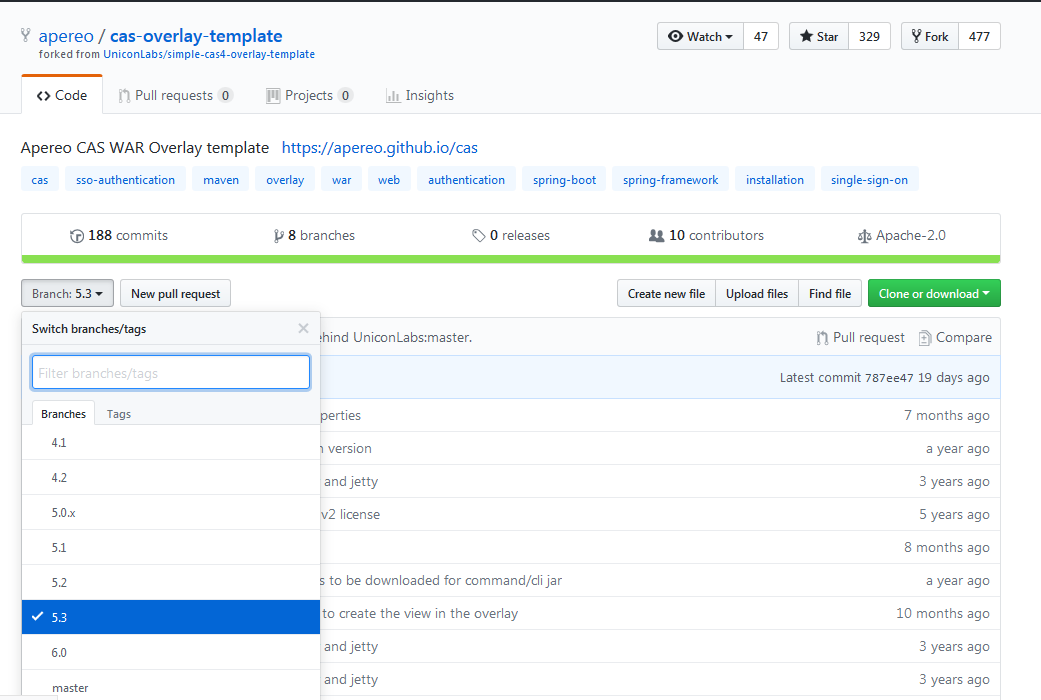
2.2.1 cas-overlay-template下载
Github地址:https://github.com/apereo/cas-overlay-template
选择5.3的版本,下载到本地。
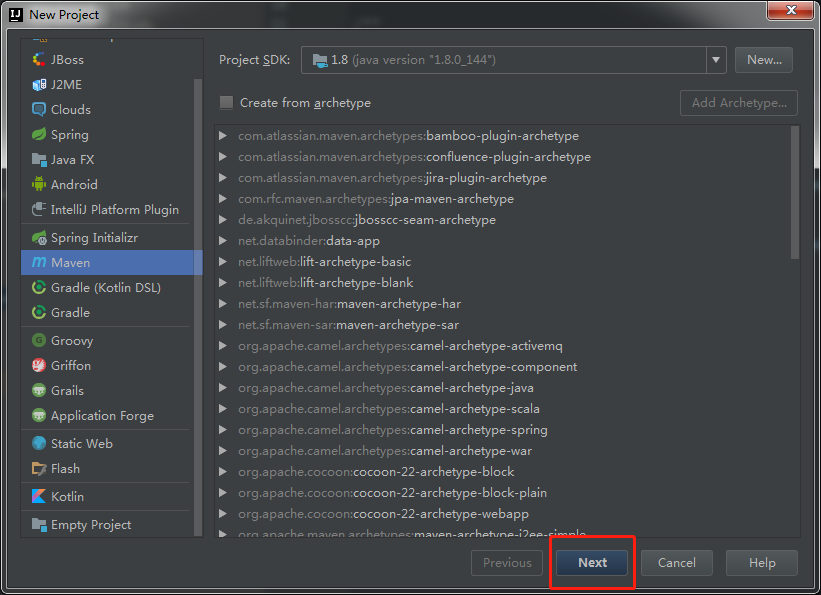
2.2.2 创建服务项目
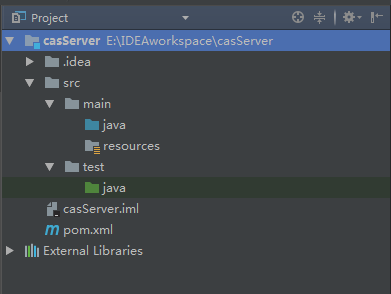
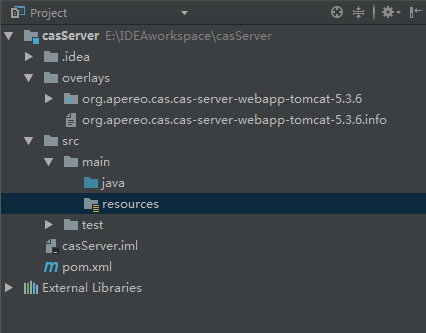
创建一个maven项目,不要任何模板。这里项目名称使用了 casServer
创建完成后项目目录如图
打开下载好的 cas-overlay-template 中的pom文件,复制
中的内容到casServer的pom文件中,将其中的仓库配置和无用的配置删掉,并且将项目的打包方式设置为war包(不是war包的话无法将overlay的包加进来),剩余内容如下 : <?xml version="1.0" encoding="UTF-8"?> <project xmlns="http://maven.apache.org/POM/4.0.0" xmlns:xsi="http://www.w3.org/2001/XMLSchema-instance" xsi:schemaLocation="http://maven.apache.org/POM/4.0.0 http://maven.apache.org/xsd/maven-4.0.0.xsd"> <modelVersion>4.0.0</modelVersion> <groupId>com.pansky</groupId> <artifactId>casServer</artifactId> <packaging>war</packaging> <version>1.0-SNAPSHOT</version> <build> <plugins> <plugin> <groupId>com.rimerosolutions.maven.plugins</groupId> <artifactId>wrapper-maven-plugin</artifactId> <version>0.0.5</version> <configuration> <verifyDownload>true</verifyDownload> <checksumAlgorithm>MD5</checksumAlgorithm> </configuration> </plugin> <plugin> <groupId>org.springframework.boot</groupId> <artifactId>spring-boot-maven-plugin</artifactId> <version>${springboot.version}</version> <configuration> <mainClass>${mainClassName}</mainClass> <addResources>true</addResources> <executable>${isExecutable}</executable> <layout>WAR</layout> </configuration> <executions> <execution> <goals> <goal>repackage</goal> </goals> </execution> </executions> </plugin> <plugin> <groupId>org.apache.maven.plugins</groupId> <artifactId>maven-war-plugin</artifactId> <version>2.6</version> <configuration> <warName>cas</warName> <failOnMissingWebXml>false</failOnMissingWebXml> <recompressZippedFiles>false</recompressZippedFiles> <archive> <compress>false</compress> <manifestFile>${manifestFileToUse}</manifestFile> </archive> <overlays> <overlay> <groupId>org.apereo.cas</groupId> <artifactId>cas-server-webapp${app.server}</artifactId> </overlay> </overlays> </configuration> </plugin> <plugin> <groupId>org.apache.maven.plugins</groupId> <artifactId>maven-compiler-plugin</artifactId> <version>3.3</version> </plugin> </plugins> <finalName>cas</finalName> </build> <properties> <cas.version>5.3.6</cas.version> <springboot.version>1.5.18.RELEASE</springboot.version> <!-- app.server could be -jetty, -undertow, -tomcat, or blank if you plan to provide appserver --> <app.server>-tomcat</app.server> <mainClassName>org.springframework.boot.loader.WarLauncher</mainClassName> <isExecutable>false</isExecutable> <manifestFileToUse>${project.build.directory}/war/work/org.apereo.cas/cas-server-webapp${app.server}/META-INF/MANIFEST.MF</manifestFileToUse> <maven.compiler.source>1.8</maven.compiler.source> <maven.compiler.target>1.8</maven.compiler.target> <project.build.sourceEncoding>UTF-8</project.build.sourceEncoding> </properties> <profiles> <profile> <activation> <activeByDefault>true</activeByDefault> </activation> <id>default</id> <dependencies> <dependency> <groupId>org.apereo.cas</groupId> <artifactId>cas-server-webapp${app.server}</artifactId> <version>${cas.version}</version> <type>war</type> <scope>runtime</scope> </dependency> <!-- ...Additional dependencies may be placed here... --> </dependencies> </profile> <profile> <activation> <activeByDefault>false</activeByDefault> </activation> <id>bootiful</id> <properties> <app.server>-tomcat</app.server> <isExecutable>false</isExecutable> </properties> <dependencies> <dependency> <groupId>org.apereo.cas</groupId> <artifactId>cas-server-webapp${app.server}</artifactId> <version>${cas.version}</version> <type>war</type> <scope>runtime</scope> </dependency> </dependencies> </profile> </profiles> </project>此处通过overlay方式引入 cas-server-webapp-tomcat包
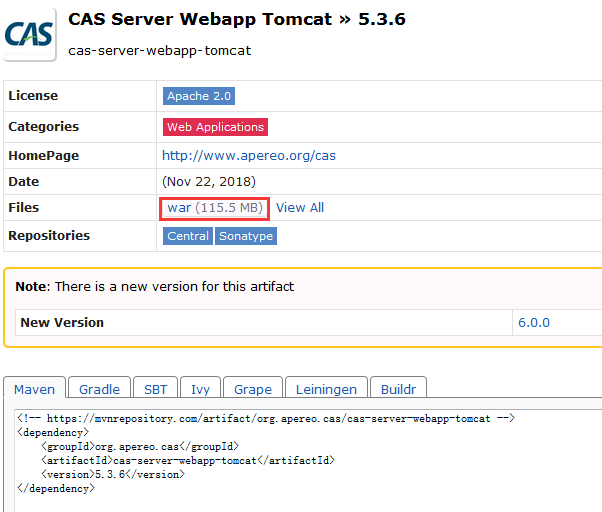
cas-server-webapp-tomcat下载非常缓慢,建议手动在maven库内下载后放入本地仓库
下载地址 https://mvnrepository.com/artifact/org.apereo.cas/cas-server-webapp-tomcat 笔记中使用5.3.6版本,点击红框处下载
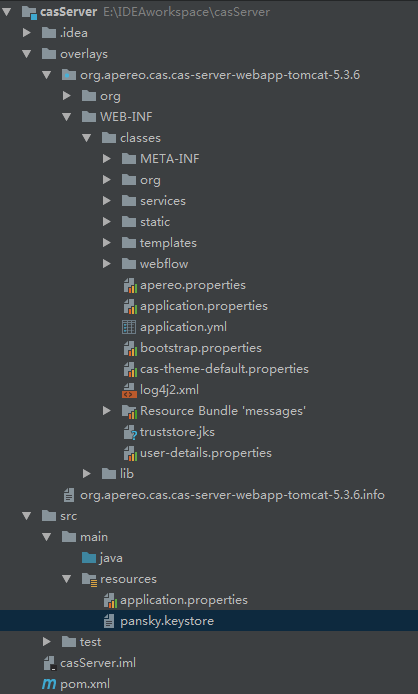
完成后项目结构如下图:
图中org.aperep.cas.cas-server-webapp-tomcat-5.3.6便是我们可以覆盖的项目,我们只需在自己的目录结构中创建与之相同路径相同名称的文件,在打包时将会进行替换,从而完成对此项目的定制。
2.2.3 配置cas
如果不使用https的话,将配置文件复制后添加上面的配置即可。
下面我们先来对cas的https证书进行配置
将overlays项目中WEB-INF下的配置文件复制一份到我们自己的目录中,并将我们前面导出的证书放到项目的根目录
下面我们来配置application.properties ,已有的配置我们不先不动,只修改证书的配置。
这里修改为我们的证书位置及密码
server.ssl.key-store=classpath:pansky.keystore
server.ssl.key-store-password=123456
server.ssl.key-password=123456
server.ssl.key-alias=pansky
使用tomcat启动时需要修改server.xml配置文件,添加https的证书效验
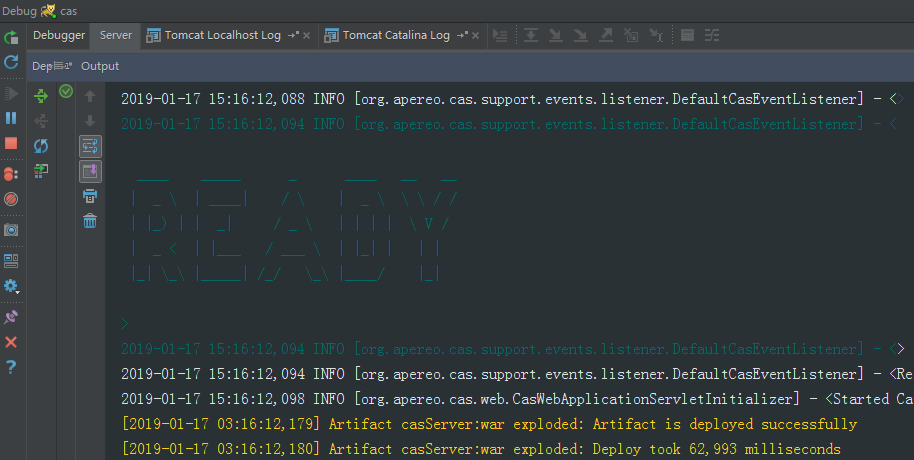
<Connector port="8080" protocol="HTTP/1.1"
            connectionTimeout="20000"
            redirectPort="8443" />
 <!-- A "Connector" using the shared thread pool-->
 <!--
 <Connector executor="tomcatThreadPool"
            port="8080" protocol="HTTP/1.1"
            connectionTimeout="20000"
            redirectPort="8443" />
 -->
 <!-- Define a SSL/TLS HTTP/1.1 Connector on port 8443
      This connector uses the NIO implementation. The default
      SSLImplementation will depend on the presence of the APR/native
      library and the useOpenSSL attribute of the
      AprLifecycleListener.
      Either JSSE or OpenSSL style configuration may be used regardless of
      the SSLImplementation selected. JSSE style configuration is used below.
 -->
		<!-- 添加的是这一段内容 -->
	<Connector
             protocol="org.apache.coyote.http11.Http11NioProtocol" port="8443"
             maxThreads="200" scheme="https"
             secure="true" SSLEnabled="true" keystoreFile="D:\key\pansky.keystore"
             keystorePass="123456" clientAuth="false" sslProtocol="TLS"/>
完成配置后即可打包项目进行启动。控制台出现如下内容表示启动成功。
特别注意,CAS5.3启动需要tomcat8.5以上版本
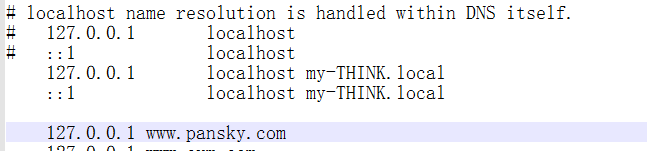
由于cas需要https域名访问,因此必须到hosts文件中配置地址映射。即将前面生成自定义证书时填写的 姓名与姓氏 www.pansky.com 与127.0.0.1进行映射。
hosts文件位置 C:\Windows\System32\drivers\etc
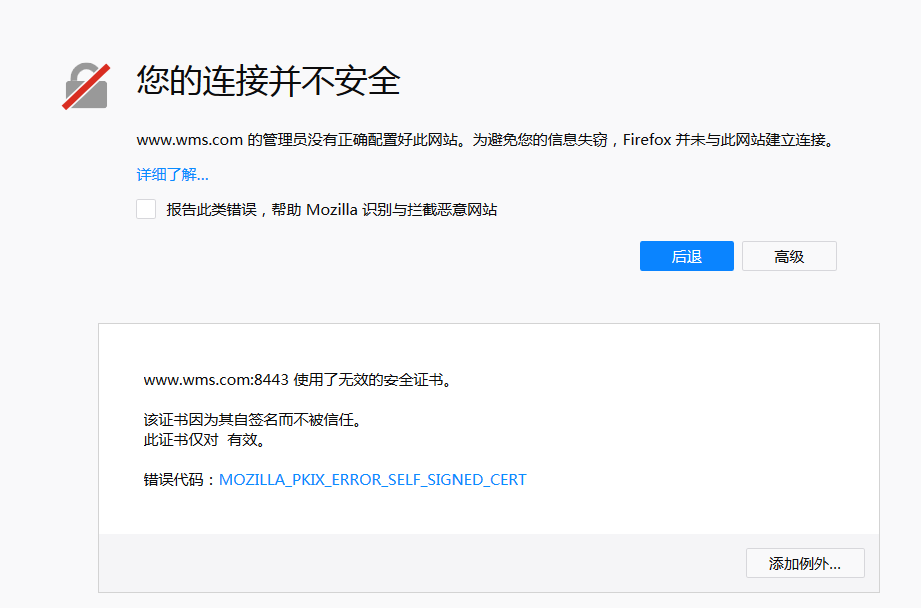
然后就可以使用 https://www.pansky.com:8443/cas进入到单点登录页面了
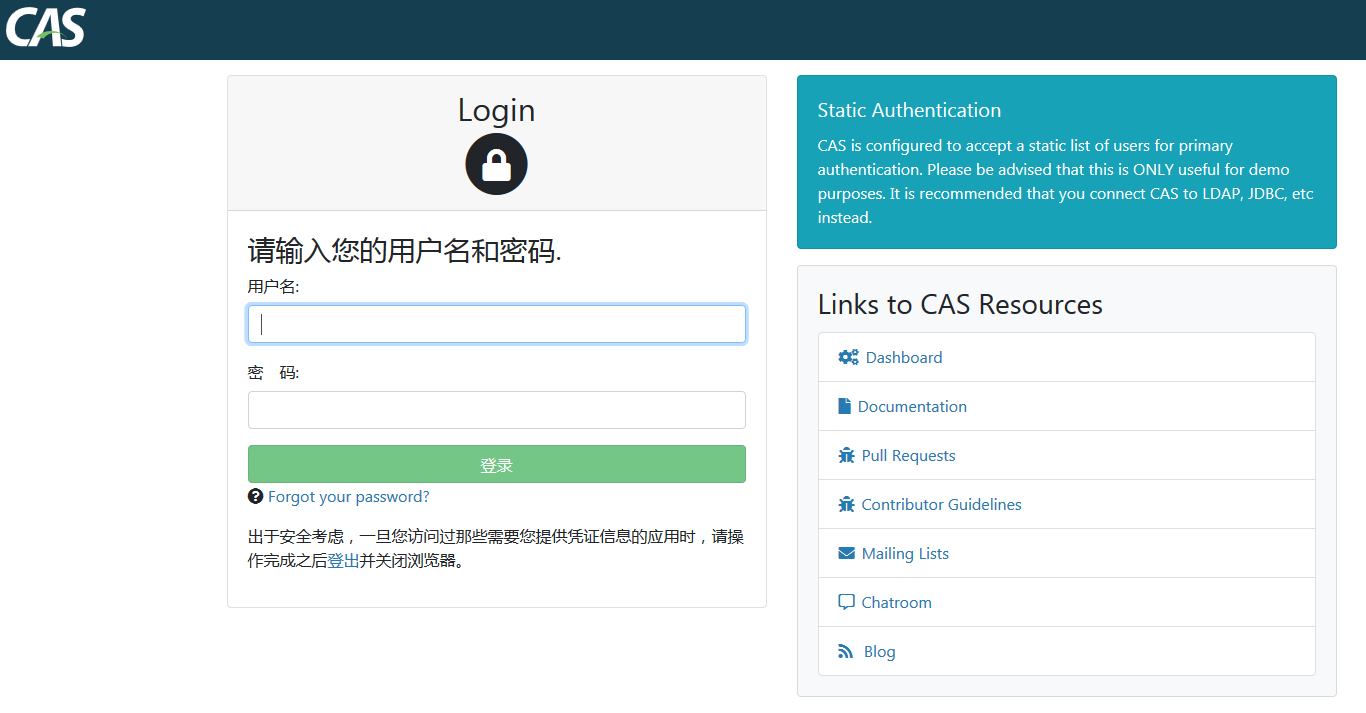
访问时由于证书是我们自己创建的,浏览器并不承认,还需要进一步设置,点击高级-添加例外,将地址添加进来。
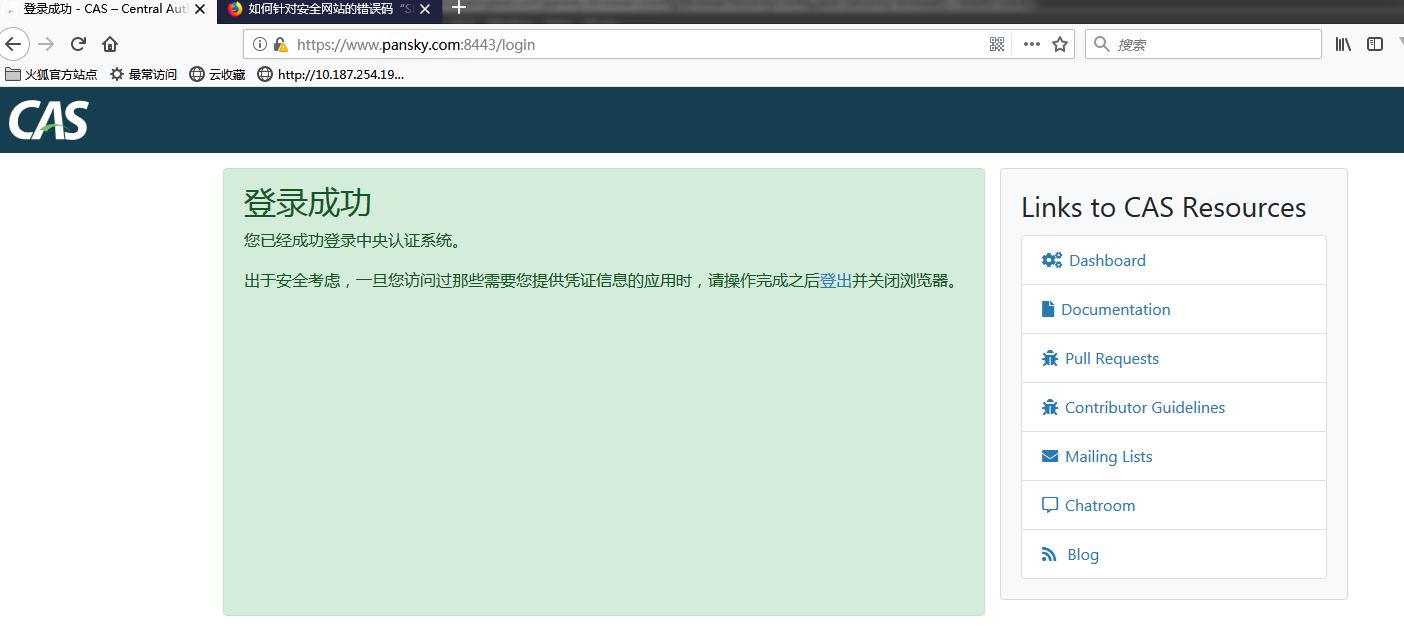
OK,页面看见了。然后使用默认的账号 casuser 密码 Mellon进行登录,显示登录成功。
至此简易版的CAS单点登录服务就搭好了。
2.3 通过数据库效验账号密码
前面登录时使用的账号密码是写死在配置文件中的,在实际生产中,当然不能这么用了,下面我们来看看如何通过获取数据库中的账号密码来完成登录操作。
2.3.1 添加依赖
想要使用数据库,必须添加相应的依赖
<dependency>
    <groupId>org.apereo.cas</groupId>
    <artifactId>cas-server-support-jdbc</artifactId>
    <version>${cas.version}</version>
</dependency>
<dependency>
    <groupId>mysql</groupId>
    <artifactId>mysql-connector-java</artifactId>
    <version>5.1.30</version>
    <scope>runtime</scope>
</dependency>
2.3.2创建账户表
然后肯定得有用户表,要不还玩个毛线。这里用的数据库是mysql5.6,表结构如下
DROP TABLE IF EXISTS `user`;
CREATE TABLE `user` (
  `id` varchar(36) NOT NULL COMMENT 'id',
  `name` varchar(50) NOT NULL DEFAULT '' COMMENT '姓名',
  `id_card` varchar(18) NOT NULL DEFAULT '' COMMENT '身份证号',
  `cell_phone` varchar(16) NOT NULL DEFAULT '' COMMENT '手机号',
  `password` varchar(32) NOT NULL DEFAULT '' COMMENT '密码',
  `status` char(1) NOT NULL DEFAULT '0' COMMENT '0 正常,1禁用',
  `del_flag` char(1) NOT NULL DEFAULT '0' COMMENT '0 存在,1 删除',
  `create_time` datetime NOT NULL DEFAULT CURRENT_TIMESTAMP COMMENT 'createTime',
  `update_time` datetime NOT NULL DEFAULT CURRENT_TIMESTAMP ON UPDATE CURRENT_TIMESTAMP COMMENT 'updateTime',
  `mail` varchar(50) DEFAULT NULL,
  `q1` varchar(100) DEFAULT NULL,
  `a1` varchar(200) DEFAULT NULL,
  `q2` varchar(200) DEFAULT NULL,
  `a2` varchar(200) DEFAULT NULL,
  PRIMARY KEY (`id`)
) ENGINE=InnoDB DEFAULT CHARSET=utf8mb4 COMMENT='user';
建好以后自己随便插入几个数据吧,这里我是用cell_phone当做用户名的。
2.3.2 配置用户表
希望cas从数据库指定的表中读取用户,肯定得告诉cas要读哪个表。然后我们通过配置来告诉它
#写死的账号密码,肯定得注释掉,因为我们要用新的获取账号密码的方式
#cas.authn.accept.users=casuser::Mellon

#查询账号密码sql,其中必须包含密码字段
cas.authn.jdbc.query[0].sql=select * from user where cell_phone=?
# 指定上面的sql查询的密码字段的名称(也就是告诉cas哪个是密码)
cas.authn.jdbc.query[0].fieldPassword=password
# 指定过期字段,1为过期,若过期不可用,就是被锁定了
cas.authn.jdbc.query[0].fieldExpired=status
# 为不可用字段段,1为不可用,需要修改密码
cas.authn.jdbc.query[0].fieldDisabled=del_flag
#数据库方言hibernate的知识
cas.authn.jdbc.query[0].dialect=org.hibernate.dialect.MySQLDialect
  #数据库驱动
cas.authn.jdbc.query[0].driverClass=com.mysql.jdbc.Driver
# 数据库连接
cas.authn.jdbc.query[0].url=jdbc:mysql://localhost:3306/xysrapi?useUnicode=true&characterEncoding=UTF-8&autoReconnect=true&useSSL=false
# 数据库用户名
cas.authn.jdbc.query[0].user=root
# 数据库密码
cas.authn.jdbc.query[0].password=root
# 默认加密策略,通过encodingAlgorithm来指定算法,默认NONE不加密
# 这里设置了MD5加密,cas会把你输入的密码进行md5加密后再与数据库的密码做对比。
#如果加密算法为自定义,则需要实现org.springframework.security.crypto.password.PasswordEncoder接口,并且把类名配置在passwordEncoder.type
cas.authn.jdbc.query[0].passwordEncoder.type=DEFAULT
cas.authn.jdbc.query[0].passwordEncoder.characterEncoding=UTF-8
cas.authn.jdbc.query[0].passwordEncoder.encodingAlgorithm=MD5
配置完成,重启项目。我们来试试数据库中的账号密码 duang~duang,好了登录成功。
这里说一下,如果提示认证失败,很有可能是你数据库的密码,记得要用MD5加密在放进去。
2.4 自定义登录效验
实际项目中,登录时我们不一定只效验账号密码,可能还有一些定制的东西来进行验证。因而登录效验的定制是必须的。本来这里想直接添加验证码效验的,但还没有写怎么定制页面,定制提示信息。。。
所以这里先看看自定义效验吧
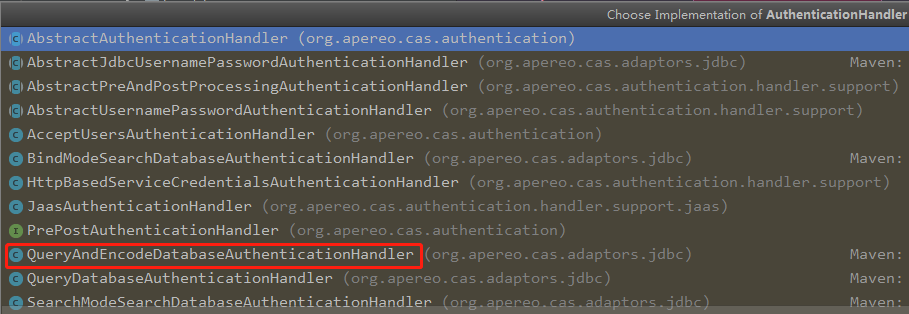
cas 的核心认证类 org.apereo.cas.authentication.AuthenticationManager ,与SringSecurity相似也是使用这个认证管理类将需要认证的信息转给其他org.apereo.cas.authentication.AuthenticationHandler接口 的实现类,在所有的实现类中,只要有一个认证成功了,AuthenticationManager就会返回认证成功。
上图是AuthenticationHandler的实现类,红框的就是效验通过配置文件里配置的sql查询到的用户与密码进行效验的实现类。
也就是说我们要自定义登录效验,只需要实现AuthenticationHandler接口就OK了。
2.4.1 添加依赖
添加cas对自定义效验的支持,所有的包在都在overlay的项目下,不在自己的项目下导入的话虽然可以看见类,但是没有办法来操作的。
<dependency>
    <groupId>org.apereo.cas</groupId>
    <artifactId>cas-server-core-authentication</artifactId>
    <version>${cas.version}</version>
</dependency>
<dependency>
    <groupId>org.apereo.cas</groupId>
    <artifactId>cas-server-core-authentication-api</artifactId>
    <version>${cas.version}</version>
</dependency>
<dependency>
    <groupId>org.apereo.cas</groupId>
    <artifactId>cas-server-core-webflow</artifactId>
    <version>${cas.version}</version>
</dependency>
<dependency>
    <groupId>org.apereo.cas</groupId>
    <artifactId>cas-server-core-webflow-api</artifactId>
    <version>${cas.version}</version>
</dependency>
2.4.2自定义AuthenticationHandler
我们通过已经有的抽象类来实现自己的AuthenticationHandler。
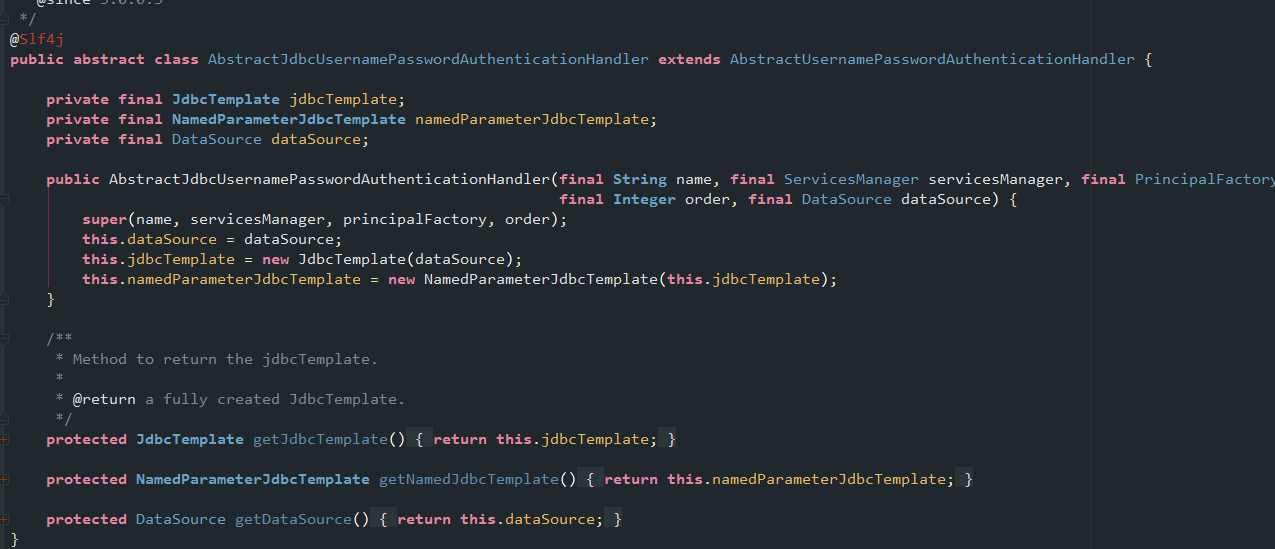
先看看已有的数据库账号密码效验类 QueryAndEncodeDatabaseAuthenticationHandler,它的结构是什么样的。
可以看到它继承了一个 AbstractJdbcUsernamePasswordAuthenticationHandler的抽象类,点进去看看。
这个类是在AbstractUsernamePasswordAuthenticationHandler的基础上添加了一些jdbc的操作类。
QueryAndEncodeDatabaseAuthenticationHandler就是使用这几个jdbc类来操作数据库的。我是打算后面加上mybatis的所以我们就不使用它了,就继承它的父类吧 AbstractUsernamePasswordAuthenticationHandler
继承后默认要实现一个authenticateUsernamePasswordInternal( )方法,从方法名就可以看出自定义的效验方法就是这个了。然后还得实现一个全参构造器。
package com.pansky.cas.authentication;

import org.apache.commons.lang3.StringUtils;
import org.apereo.cas.authentication.AuthenticationHandlerExecutionResult;
import org.apereo.cas.authentication.PreventedException;
import org.apereo.cas.authentication.UsernamePasswordCredential;
import org.apereo.cas.authentication.handler.support.AbstractUsernamePasswordAuthenticationHandler;
import org.apereo.cas.authentication.principal.PrincipalFactory;
import org.apereo.cas.services.ServicesManager;

import javax.security.auth.login.FailedLoginException;
import java.security.GeneralSecurityException;
import java.util.ArrayList;

/**
 * 描述:
 * 自定义登录效验
 *
 * @author Xue_Pan
 * @create 2019-01-18 9:35
 */
public class MyAuthenticationHandler extends AbstractUsernamePasswordAuthenticationHandler {

    public MyAuthenticationHandler(String name, ServicesManager servicesManager, PrincipalFactory principalFactory, Integer order) {
        super(name, servicesManager, principalFactory, order);
    }

    @Override
    protected AuthenticationHandlerExecutionResult authenticateUsernamePasswordInternal(UsernamePasswordCredential credential, String originalPassword) throws GeneralSecurityException, PreventedException {
        String username = credential.getUsername();
        //如果登录的人不是刘德华,就登录失败
        if(!StringUtils.equals("刘德华",username)){
            throw new FailedLoginException("登录失败");
        }
        //返回值这里我们从QueryAndEncodeDatabaseAuthenticationHandler那里copy一份
        return createHandlerResult(credential, this.principalFactory.createPrincipal(username), new ArrayList<>(0));
    }
}
这里做一个说明 credential是cas的认证类,保存了用户的认证信息。

2.4.3 注册自定义登录效验
cas的AuthenticationHandler对象都是放在一个叫 authenticationHandlerPrincipalResolverMap 的map中的,想要我们自定义的生效,就得把我们自定义的效验器也放进去。
我们通过实现AuthenticationEventExecutionPlanConfigurer接口的configureAuthenticationExecutionPlan()方法来添加
package com.pansky.cas.config;

import com.pansky.cas.authentication.MyAuthenticationHandler;
import org.apereo.cas.authentication.AuthenticationEventExecutionPlan;
import org.apereo.cas.authentication.AuthenticationEventExecutionPlanConfigurer;
import org.apereo.cas.authentication.AuthenticationHandler;
import org.apereo.cas.authentication.principal.DefaultPrincipalFactory;
import org.apereo.cas.services.ServicesManager;
import org.springframework.beans.factory.annotation.Autowired;
import org.springframework.context.annotation.Bean;
import org.springframework.context.annotation.Configuration;

/**
 * 描述:
 * 自定义登录效验注册类
 *
 * @author Xue_Pan
 * @create 2019-01-18 10:19
 */

@Configuration
public class MyAuthenticationHandlerPlanConfigurer implements AuthenticationEventExecutionPlanConfigurer {

    @Autowired
    ServicesManager servicesManager;

    /**
     * 创建自定义的AuthenticationHandler对象
     * 第一个参数 是对象名 myAuthenticationHandler
     * 第二个参数是cas自己创建的对象servicesManager
     */
    @Bean
    public AuthenticationHandler myAuthenticationHandler(){
       return new MyAuthenticationHandler(MyAuthenticationHandler.class.getSimpleName(),
               servicesManager,new DefaultPrincipalFactory(),1);
    }
    @Override
    public void configureAuthenticationExecutionPlan(AuthenticationEventExecutionPlan plan) {
        plan.registerAuthenticationHandler(myAuthenticationHandler());
    }
}
2.4.4 加载注册自定义效验的配置类
这里比较绕,上面写了注册效验的配置类,要让spring加载我们自己配置文件。
用到的原理就是利用springboot的自动配置注解@EnableAutoConfiguration,对这里不清楚的同学需要自行了解了。下面说怎么操作。
首先在资源文件夹下创建一个文件夹META-INF,然后将 overlay 中META-INF下的spring.factories文件copy一份放到我们这个文件夹下,也就是说要在我们这个项目里重写这个文件。
在文件后面添加上我们自己写的配置类的全类名,springboot自动配置注解会将所有的全类名配置类放入容器。
org.springframework.boot.autoconfigure.EnableAutoConfiguration=\
  org.apereo.cas.config.CasEmbeddedContainerTomcatConfiguration,\
  org.apereo.cas.config.CasEmbeddedContainerTomcatFiltersConfiguration,\
  com.pansky.cas.config.MyAuthenticationHandlerPlanConfigurer
接着就可以重启项目试试效果了。
毫无疑问,只要用户名 是 ‘刘德华’ ,随便是什么密码也都能登录成功。
然后再试试 数据库里的账号密码
也登录成功了,这是Qxxxxx那个类起作用了。
2.5 搭建客户端
我们使用cas的另一个项目cas-sample-java-webapp 来完成客户端的搭建
下载地址 gitHub: https://github.com/cas-projects/cas-sample-java-webapp
直接下载master版就可以。
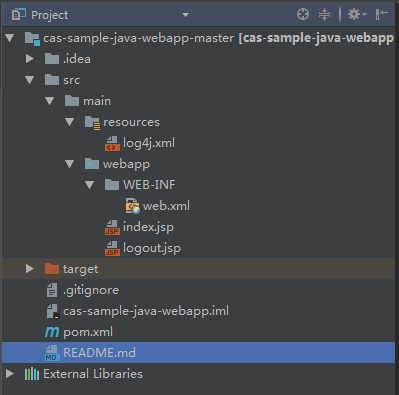
下载完直接导入 idea
可以看到里面有个etc文件夹,里面放的是jetty的配置文件,我们使用tomcat,所以可以直接干掉这个。
然后项目结构如下
2.5.1 修改配置
pom文件中把jetty的插件删掉,剩余内容如下。
<project xmlns="http://maven.apache.org/POM/4.0.0" xmlns:xsi="http://www.w3.org/2001/XMLSchema-instance"
         xsi:schemaLocation="http://maven.apache.org/POM/4.0.0 http://maven.apache.org/xsd/maven-4.0.0.xsd">
    <modelVersion>4.0.0</modelVersion>
    <groupId>iamlabs.unicon.net</groupId>
    <artifactId>cas-sample-java-webapp</artifactId>
    <version>0.0.1-SNAPSHOT</version>
    <packaging>war</packaging>
    <name>CAS Example Java Web App</name>
    <description>A sample web application that exercises the CAS protocol features via the Java CAS Client.</description>
    <build>
        <finalName>cas-sample-java-webapp</finalName>
        <plugins>
            <plugin>
                <groupId>org.apache.maven.plugins</groupId>
                <artifactId>maven-compiler-plugin</artifactId>
                <version>3.5.1</version>
                <configuration>
                    <source>1.8</source>
                    <target>1.8</target>
                </configuration>
            </plugin>
        </plugins>
    </build>

    <dependencies>
        <dependency>
            <groupId>commons-logging</groupId>
            <artifactId>commons-logging</artifactId>
            <version>1.1.1</version>
        </dependency>

        <dependency>
            <groupId>log4j</groupId>
            <artifactId>log4j</artifactId>
            <version>1.2.17</version>
        </dependency>

        <dependency>
            <groupId>org.jasig.cas.client</groupId>
            <artifactId>cas-client-core</artifactId>
            <version>3.4.1</version>
            <exclusions>
                <exclusion>
                    <groupId>javax.servlet</groupId>
                    <artifactId>servlet-api</artifactId>
                </exclusion>
            </exclusions>
        </dependency>
    </dependencies>
</project>
修改web.xml中的过滤器,这个项目默认配置好了过滤器,我们只需要将重定向的路径设置好就行
<?xml version="1.0" encoding="UTF-8"?>
<web-app version="2.4" xmlns="http://java.sun.com/xml/ns/j2ee" xmlns:xsi="http://www.w3.org/2001/XMLSchema-instance"
         xsi:schemaLocation="http://java.sun.com/xml/ns/j2ee http://java.sun.com/xml/ns/j2ee/web-app_2_4.xsd">

<!--
   <context-param>
       <param-name>renew</param-name>
       <param-value>true</param-value>
   </context-param>
-->
    <!--单点登出的过滤器,被拦截的请求,重定向到 param-value -->
    <filter>
        <filter-name>CAS Single Sign Out Filter</filter-name>
        <filter-class>org.jasig.cas.client.session.SingleSignOutFilter</filter-class>
        <init-param>
            <param-name>casServerUrlPrefix</param-name>
            <param-value>https://www.pansky:8443/cas</param-value>
        </init-param>
    </filter>
    <!--单点登出的监听器-->
    <listener>
        <listener-class>org.jasig.cas.client.session.SingleSignOutHttpSessionListener</listener-class>
    </listener>

    <!--单点登录的过滤器-->
    <filter>
        <filter-name>CAS Authentication Filter</filter-name>
        <filter-class>org.jasig.cas.client.authentication.AuthenticationFilter</filter-class>
        <init-param>
            <param-name>casServerLoginUrl</param-name>
            <!--设置注册中心登录的地址-->
            <param-value>https://www.pansky.com:8443/cas/login</param-value>
        </init-param>
        <init-param>
            <param-name>serverName</param-name>
            <!--客户端的地址-->
            <param-value>http://www.crm.com:8088/client1</param-value>
        </init-param>
    </filter>

    <filter>
        <filter-name>CAS Validation Filter</filter-name>
        <filter-class>org.jasig.cas.client.validation.Cas30ProxyReceivingTicketValidationFilter</filter-class>
        <init-param>
            <param-name>casServerUrlPrefix</param-name>
            <!--设置注册中心的地址-->
            <param-value>https://www.pansky.com:8443/cas</param-value>
        </init-param>
        <init-param>
            <param-name>serverName</param-name>
            <param-value>http://www.crm.com:8088/client1</param-value>
        </init-param>
        <init-param>
            <param-name>redirectAfterValidation</param-name>
            <param-value>true</param-value>
        </init-param>
        <init-param>
            <param-name>useSession</param-name>
            <param-value>true</param-value>
        </init-param>
        <init-param>
            <param-name>authn_method</param-name>
            <param-value>mfa-duo</param-value>
        </init-param>
    </filter>

    <filter>
        <filter-name>CAS HttpServletRequest Wrapper Filter</filter-name>
        <filter-class>org.jasig.cas.client.util.HttpServletRequestWrapperFilter</filter-class>
    </filter>

    <filter-mapping>
        <filter-name>CAS Single Sign Out Filter</filter-name>
        <url-pattern>/*</url-pattern>
    </filter-mapping>

    <filter-mapping>
        <filter-name>CAS Validation Filter</filter-name>
        <url-pattern>/*</url-pattern>
    </filter-mapping>

    <filter-mapping>
        <filter-name>CAS Authentication Filter</filter-name>
        <url-pattern>/*</url-pattern>
    </filter-mapping>

    <filter-mapping>
        <filter-name>CAS HttpServletRequest Wrapper Filter</filter-name>
        <url-pattern>/*</url-pattern>
    </filter-mapping>

    <welcome-file-list>
        <welcome-file>
            index.jsp
        </welcome-file>
    </welcome-file-list>
</web-app>
设置完后,在hosts文件中把 www.crm.com这个也映射带127.0.0.1
就可以使用tomcat把项目跑起来了(端口设置了8088)。
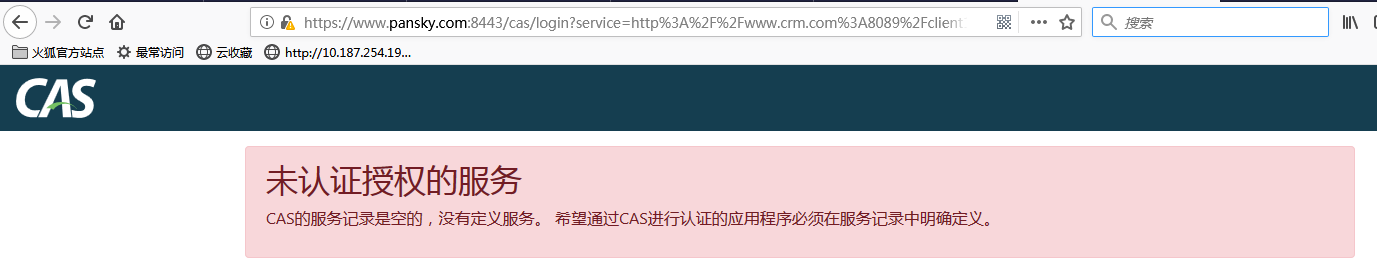
直接访问路径 www.crm.com:8088/client1
页面跳转到注册中心,但是提示未认证授权的服务。
这是由于客户端时http,而注册中心不支持造成的,下面我们来解决这个问题。
2.5.2 配置服务端支持http
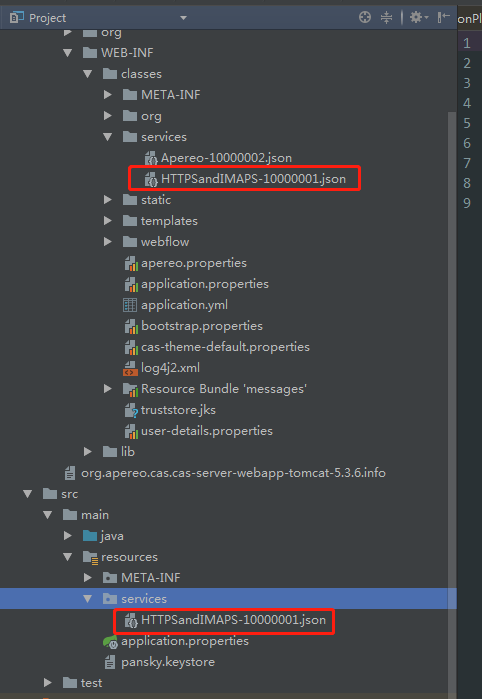
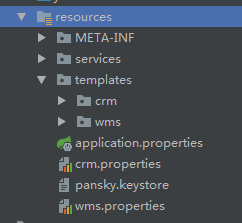
切换到服务端代码,现在resources文件夹下创建一个services文件夹,并将overlay 中同目录下的HTTPSandIMAPS-10000001.json文件复制一份到新创建的services文件夹下
这个文件后面自定义页面时我们在详细看看是怎么回事,这里我们先配置好http的支持
在”serviceId”的正则内添加http。如下所示,然后重启服务端项目
{
  "@class" : "org.apereo.cas.services.RegexRegisteredService",
  "serviceId" : "^(https|imaps|http)://.*",
  "name" : "HTTPS and IMAPS",
  "id" : 10000001,
  "description" : "This service definition authorizes all application urls that support HTTPS and IMAPS protocols.",
  "evaluationOrder" : 10000
}
2.5.3 登录测试
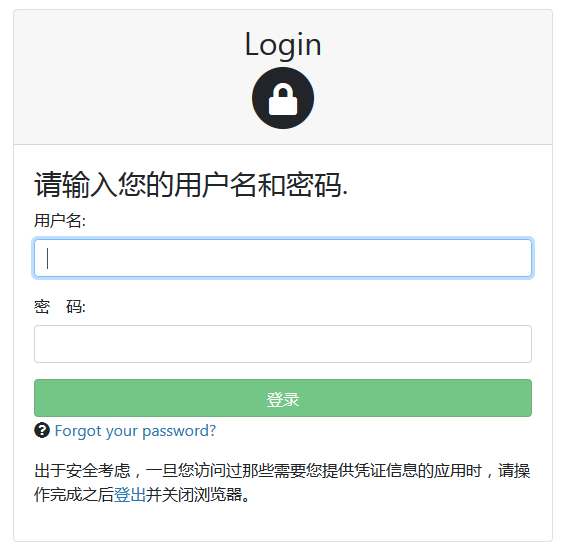
重新访问地址 www.crm.com:8088/client1,显示正常,输入账号密码
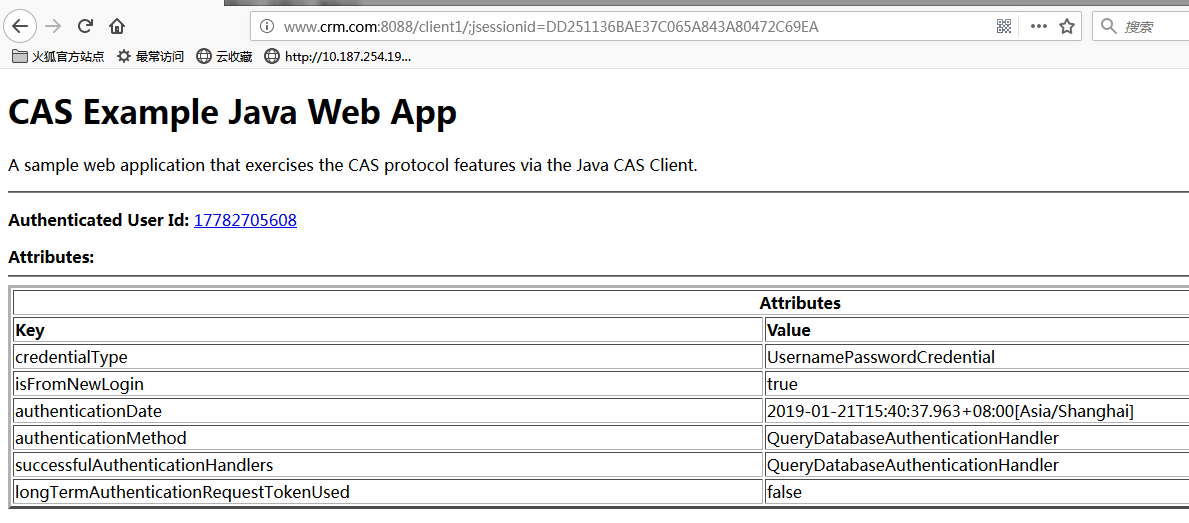
页面显示,可以正常访问。
2.6 基于springboot的客户端
上面是普通web项目的客户端搭建,下面我们来看看基于springboot的cas客户端搭建。
使用idea的快速创建springboot项目(不详述)
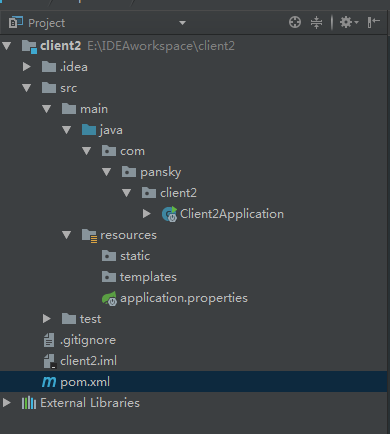
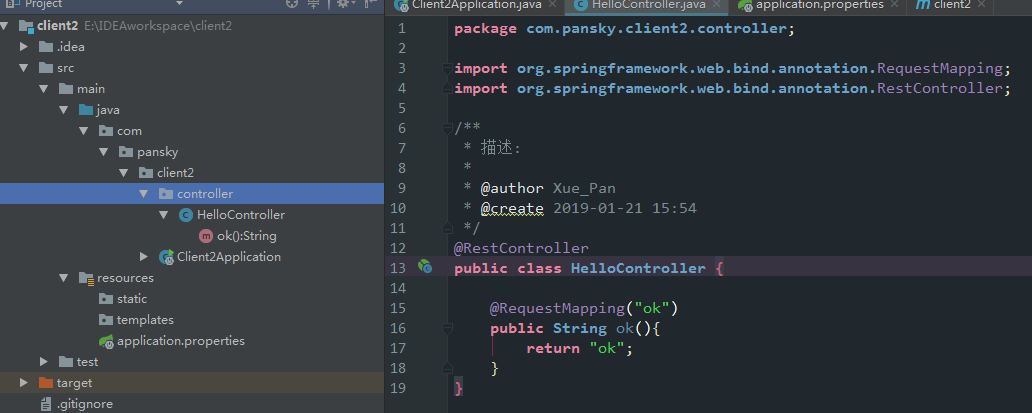
创建好的项目结构如下图
2.6.1 添加依赖
cas有springboot的客户端starter
在pom文件中引入依赖
<dependency>
    <groupId>net.unicon.cas</groupId>
    <artifactId>cas-client-autoconfig-support</artifactId>
    <version>1.5.0-GA</version>
</dependency>
通过@EnableCasClient 引入cas默认自动配置:
在主配置类上添加 @EnableCasClient
package com.pansky.client2;

import net.unicon.cas.client.configuration.EnableCasClient;
import org.springframework.boot.SpringApplication;
import org.springframework.boot.autoconfigure.SpringBootApplication;

@SpringBootApplication
@EnableCasClient
public class Client2Application {

	public static void main(String[] args) {
		SpringApplication.run(Client2Application.class, args);
	}
}
2.6.2配置
在配置文件中添加如下配置,设置过滤器跳转的路径。
server.port=8089
# 填CAS服务器的前缀
cas.server-url-prefix=https://www.pansky.com:8443/cas
# 填CAS服务器的登录地址
cas.server-login-url=https://www.pansky.com:8443/cas/login
# 填客户端的访问前缀 www.wms.com是在host文件中配置的映射,映射到127.0.0.1
cas.client-host-url=http://www.wms.com:8089
创建一个controller 如图
然后运行主配置类 main方法启动项目。
访问 http://www.wms.com:8089/ok
跳转至登录页面,登录后页面显示 ok 。
3. cas的实际应用
上面的项目搭建只是基础,想在实际中运用cas还远远不够。
实际项目中我们需要更深层次的定制,而不是使用cas的默认配置。
下面我们将项目渐渐往实际应用中靠拢。
3.1 登录页面定制
单点登录是将不同的系统的登录统一起来,不同的系统,风格不一致,为了不让登录的界面与原系统的整体风格脱离cas提供了分主题定制的功能。它能够根据访问的跳转路径来匹配不同的主题,以便于我们针对不同的系统制作不同主题的登录页面。
cas默认的登录页面是 templates/casLoginView.html,单一登录页面只需要覆盖此页面进行修改即可,如果要区分主题则需要进行如下操作。
3.1.1 json配置主题
前面我们在解决http页面跳转时覆盖修改过这个文件:HTTPSandIMAPS-10000001.json,在里面修改了正则匹配规则。下面我们来仔细了解一下这个文件
文件名的结构 【theme】-【id】.json 前面是主题名,后面是id号
{
    //处理注册service的类
  "@class" : "org.apereo.cas.services.RegexRegisteredService",
    //进行路径匹配的正则,匹配上了则适用这个配置
  "serviceId" : "^(https|imaps|http)://.",
   //名称
  "name" : "HTTPS and IMAPS",
    //id编号
  "id" : 10000001,
    //描述
  "description" : "This service definition authorizes all application urls that support HTTPS and IMAPS protocols.",
    //排序,相同主题的话选排序靠前
  "evaluationOrder" : 100000
}
json中还可以添加 属性 theme来表示主题,与映射相似,映射到不同的主题,则可以跳转不同主题的页面,加载不同主题的配置文件和静态资源。
下面我们来自定义主题 crm、wms
在services文件夹下创建2个json文件
配置分别如下
crm 匹配 www.crm.com
{
  "@class" : "org.apereo.cas.services.RegexRegisteredService",
  "serviceId" : "^(https|imaps|http)://www.crm.com.*",
  "name" : "crm系统主题",
  "id" : 10000,
  "description" :"crm系统",
  "evaluationOrder" : 10,
  "theme" : "crm"
}
wms 匹配 www.wms.com
{
  "@class" : "org.apereo.cas.services.RegexRegisteredService",
  "serviceId" : "^(https|imaps|http)://www.wms.com.*",
  "name" : "wms系统主题",
  "id" : 10001,
  "description" :"wms系统",
  "evaluationOrder" : 11,
  "theme" : "wms"
}

3.1.2 主题页面定制
主题service注册好后,就可以针对主题来定制页面了
在项目tamplates下按照主题名创建文件夹,在resources下按照主题名创建properties文件
分别在crm、wms文件夹下创建 casLoginView.html 页面,这是cas默认的登录页面名称。
针对主题名的properties都是里都是各个主题的配置。
crm.properties
crm.login.pagetitle=crm的标题wms.properties
crm.login.pagetitle=wms的标题crm 页面内容
<!DOCTYPE html>
<html xmlns:th="http://www.thymeleaf.org">

<head>
    <meta http-equiv="X-UA-Compatible" content="IE=edge"/>
    <meta name="viewport" content="width=device-width, initial-scale=1, shrink-to-fit=no"/>

    <title th:text="#{crm.login.pagetitle}">crm</title>
    <link href="../../static/css/cas.css" rel="stylesheet" th:remove="tag"/>
</head>

<body class="login">
<a href="http://www.crm.com:8088/client1">crm主题</a>
<a href="http://www.wms.com:8089/ok">wms主题</a>
<h3>crm主题</h3>
<form method="post" action="login" th:object="${credential}">
    用户名<input name="username">
    密码 <input name="password">
    //必须有的参数
    <input type="hidden" name="execution" th:value="${flowExecutionKey}"/>
    <input type="hidden" name="_eventId" value="submit"/>
    <input type="hidden" name="geolocation"/>
    <button>提交</button>
</form>
<div th:each="err : ${#fields.errors('*')}" th:utext="${err}"></div>
</body>
</html>
wms 使用原本页面
<!DOCTYPE html>
<html xmlns:layout="http://www.ultraq.net.nz/thymeleaf/layout" layout:decorate="~{layout}"
      xmlns:th="http://www.thymeleaf.org">

<head>
    <meta http-equiv="X-UA-Compatible" content="IE=edge"/>
    <meta name="viewport" content="width=device-width, initial-scale=1, shrink-to-fit=no"/>

    <title th:text="#{cas.login.pagetitle}">CAS Acceptable Use Policy View</title>
    <link href="../../static/css/cas.css" rel="stylesheet" th:remove="tag" />

</head>

<body class="login">
<main role="main" class="container mt-3 mb-3">
    <div layout:fragment="content" class="row">
        <div class="col-md">
            <!-- Login form template begins here -->
            <div th:fragment="loginform" class="card">
                <div class="card-header text-center">
                    <h2 th:text="#{cas.login.pagetitle}">Login</h2>
                    <span class="fa-stack fa-2x hidden-xs">
                      <i class="fa fa-circle fa-stack-2x"></i>
                      <i class="fa fa-lock fa-stack-1x fa-inverse"></i>
                    </span>
                </div>
                <div class="card-body">
                    <form method="post" id="fm1" th:object="${credential}" action="login">
                        <div class="alert alert-danger" th:if="${#fields.hasErrors('*')}">
                            <span th:each="err : ${#fields.errors('*')}" th:utext="${err}">Example error</span>
                        </div>

                        <h3 th:utext="#{screen.welcome.instructions}">Enter your Username and Password</h3>

                        <section class="form-group">
                            <label for="username" th:utext="#{screen.welcome.label.netid}">Username</label>

                            <div th:if="${openIdLocalId}">
                                <strong>
                                    <span th:utext="${openIdLocalId}"/>
                                </strong>
                                <input type="hidden"
                                       id="username"
                                       name="username"
                                       th:value="${openIdLocalId}"/>
                            </div>
                            <div th:unless="${openIdLocalId}">
                                <input class="form-control required"
                                       id="username"
                                       size="25"
                                       tabindex="1"
                                       type="text"
                                       th:disabled="${guaEnabled}"
                                       th:field="*{username}"
                                       th:accesskey="#{screen.welcome.label.netid.accesskey}"
                                       autocomplete="off"/>
                            </div>
                        </section>

                        <section class="form-group">
                            <label for="password" th:utext="#{screen.welcome.label.password}">Password</label>

                            <div>
                                <input class="form-control required"
                                       type="password"
                                       id="password"
                                       size="25"
                                       tabindex="2"
                                       th:accesskey="#{screen.welcome.label.password.accesskey}"
                                       th:field="*{password}"
                                       autocomplete="off"/>
                                <span id="capslock-on" style="display:none;">
                                <p>
                                    <i class="fa fa-exclamation-circle"></i>
                                    <span th:utext="#{screen.capslock.on}"/>
                                </p>
                            </span>
                            </div>
                        </section>
                        <section class="form-group">
                            <label for="captcha" th:utext="验证码">Password</label>

                            <div>
                                <input class="form-control required"
                                       id="captcha"
                                       name="captcha"
                                       size="25"
                                       tabindex="2"
                                       autocomplete="off"/>
                            </div>
                        </section>

                        <section class="form-check" th:if="${passwordManagementEnabled && param.doChangePassword != null}">
                            <p>
                                <input type="checkbox" name="doChangePassword" id="doChangePassword"
                                       value="true" th:checked="${param.doChangePassword != null}" tabindex="4"/>
                                <label for="doChangePassword" th:text="#{screen.button.changePassword}">Change Password</label>
                            </p>
                        </section>

                        <section class="form-check" th:if="${rememberMeAuthenticationEnabled}">
                            <p>
                                <input type="checkbox" name="rememberMe" id="rememberMe" value="true" tabindex="5"/>
                                <label for="rememberMe" th:text="#{screen.rememberme.checkbox.title}">Remember Me</label>
                            </p>
                        </section>

                        <section class="row" th:if="${recaptchaSiteKey != null AND recaptchaInvisible != null AND recaptchaSiteKey AND !recaptchaInvisible}">
                            <div class="g-recaptcha" th:attr="data-sitekey=${recaptchaSiteKey}"/>
                        </section>

                        <input type="hidden" name="execution" th:value="${flowExecutionKey}"/>
                        <input type="hidden" name="_eventId" value="submit"/>
                        <input type="hidden" name="geolocation"/>
                        <input class="btn btn-block btn-submit"
                               th:unless="${recaptchaSiteKey != null AND recaptchaInvisible != null AND recaptchaSiteKey AND recaptchaInvisible}"
                               name="submit"
                               accesskey="l"
                               th:value="#{screen.welcome.button.login}"
                               tabindex="6"
                               type="submit"
                               value="Login3"
                        />
                        <button class="btn btn-block btn-submit g-recaptcha"
                                th:if="${recaptchaSiteKey != null AND recaptchaInvisible != null AND recaptchaSiteKey AND recaptchaInvisible}"
                                th:attr="data-sitekey=${recaptchaSiteKey}, data-badge=${recaptchaPosition}"
                                data-callback="onSubmit"
                                name="submitBtn"
                                accesskey="l"
                                th:text="#{screen.welcome.button.login}"
                                tabindex="6"
                        ></button>
                    </form>

                    <form th:if="${passwordManagementEnabled}" method="post" id="passwordManagementForm">
                        <input type="hidden" name="execution" th:value="${flowExecutionKey}"/>
                        <input type="hidden" name="_eventId" value="resetPassword"/>
                        <span class="fa fa-unlock"></span>
                        <a th:utext="#{screen.pm.button.resetPassword}" href="javascript:void(0)" onclick="$('#passwordManagementForm').submit();"></a>
                        <p/>
                    </form>

                    <div th:unless="${passwordManagementEnabled}">
                        <span class="fa fa-question-circle"></span>
                        <span th:utext="#{screen.pm.button.forgotpwd}">Forgot your password?</span>
                        <p/>
                    </div>

                    <script type="text/javascript" th:inline="javascript">
                        var i = [[#{screen.welcome.button.loginwip}]]
                        $( document ).ready(function() {
                            $("#fm1").submit(function () {
                                $(":submit").attr("disabled", true);
                                $(":submit").attr("value", i);
                                console.log(i);
                                return true;
                            });
                        });
                    </script>

                    <div th:replace="fragments/loginsidebar :: loginsidebar" />
                </div>
            </div>
        </div>
        <div id="notices" class="col-md mt-3 mt-md-0">
            <div th:replace="fragments/insecure :: insecure"><a href="fragments/insecure.html">insecure alert goes
                here</a></div>
            <div th:replace="fragments/defaultauthn :: staticAuthentication">
                <a href="fragments/defaultauthn.html">defaultAuthn</a>
                fragment
            </div>
            <div th:replace="fragments/cookies :: cookiesDisabled"><a href="fragments/cookies.html">cookies</a> fragment
            </div>
            <div th:replace="fragments/serviceui :: serviceUI"><a href="fragments/serviceui.html">service ui</a> fragment</div>
            <div th:replace="fragments/loginProviders :: loginProviders"><a href="fragments/loginProviders.html">loginProviders</a>
                fragment
            </div>
            <div th:replace="fragments/cas-resources-list :: cas-resource-list">
                <a href="fragments/cas-resources-list.html">cas-resource</a> list fragment
            </div>
        </div>
    </div>
</main>
</body>
</html>
cas的页面使用的是thymeleaf 模板引擎,默认会对页面有缓存效果,不方便我们对页面进行修改调试,所以先把缓存关掉。
在主配置文件中将缓存关闭
spring.thymeleaf.cache=false重启项目,分别访问不同系统的客户端,则会发现登录页面有变化。
3.2 附带验证码的登录
实际项目中,一般会有多次登录失败需要填写验证码进行登录,或者直接就需要验证码登录的需求,而cas默认登录是不带验证码的,下面我们来看看如何实现。
3.2.1 探索cas的登录
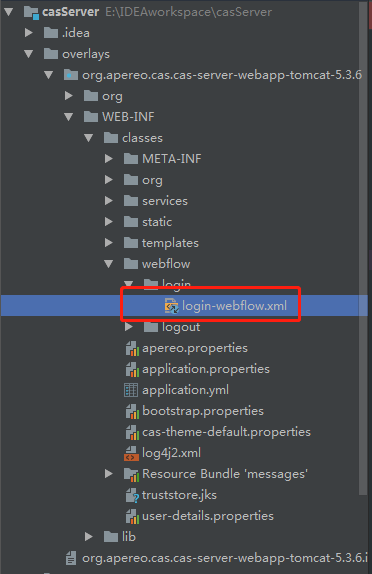
在overlay 项目的webflow下的登录配置login-webflow.xml
里面有这么一段
 <view-state id="viewLoginForm" view="casLoginView" model="credential">
        <binder>
            <binding property="username" required="true"/>
            <binding property="password" required="true"/>
        </binder>
        <transition on="submit" bind="true" validate="true" to="realSubmit" history="invalidate"/>
    </view-state>
可以看到用户名与密码都被绑定到credential这个对象上了。
现在我们看看这个对象到底是什么。依照spring默认的对象名称 我们先找找这个 Credential
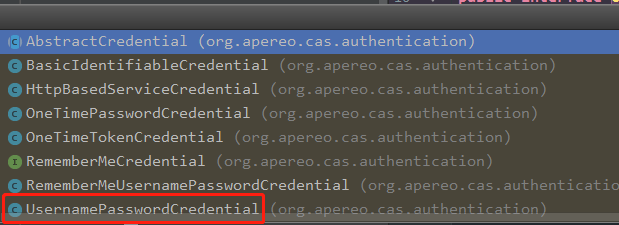
点过去发现是一个接口,那么在看看它的实现类
根据经验来看,应该是这个类了。
@Slf4j
@ToString(exclude = { "password" })
@Getter
@Setter
@NoArgsConstructor
@AllArgsConstructor
@EqualsAndHashCode
public class UsernamePasswordCredential implements Credential {

    /**
     * Authentication attribute name for password.
     **/
    public static final String AUTHENTICATION_ATTRIBUTE_PASSWORD = "credential";

    private static final long serialVersionUID = -700605081472810939L;

    @Size(min = 1, message = "required.username")
    private String username;

    @Size(min = 1, message = "required.password")
    private String password;

    @Override
    public String getId() {
        return this.username;
    }
}
但是看起来也没什么用呀。(这里可以给这个类打断点的)
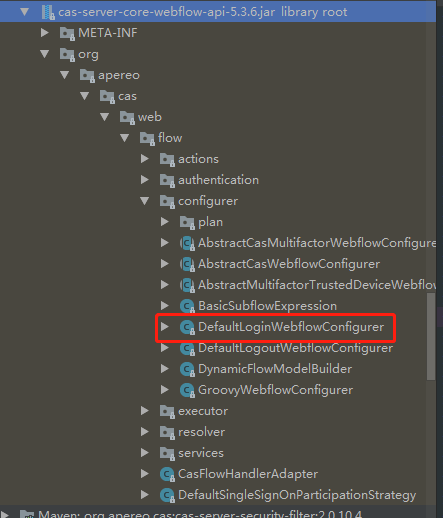
然后再去看看cas-server-core-webflow-api-5.3.6.jar包里有什么东西。
cas项目中带-api的一般都是实现类,不带的都是放接口的。
这里可以看到红框标记的,明显是跟登录有关的。
打开后在里面找到了这么一段代码
protected void createRememberMeAuthnWebflowConfig(final Flow flow) {
    	//如果激活了记住我
        if (casProperties.getTicket().getTgt().getRememberMe().isEnabled()) {
            //创建一个FlowVariable是基于RememberMeUsernamePasswordCredential的
            createFlowVariable(flow, CasWebflowConstants.VAR_ID_CREDENTIAL, RememberMeUsernamePasswordCredential.class);
            final ViewState state = getState(flow, CasWebflowConstants.STATE_ID_VIEW_LOGIN_FORM, ViewState.class);
            final BinderConfiguration cfg = getViewStateBinderConfiguration(state);
            //绑定了一个rememberMe的参数
            cfg.addBinding(new BinderConfiguration.Binding("rememberMe", null, false));
        } else {
            //否则,创建一个基于UsernamePasswordCredential的FlowVariable
            createFlowVariable(flow, CasWebflowConstants.VAR_ID_CREDENTIAL, UsernamePasswordCredential.class);
        }
    }
很明显是在这个方法中根据判断来创建不同的credential。
刚刚好,我们可以仿照着来写一个我们自己的credential,再把我们自己的credential放进去就OK了。

3.2.2 自定义credential
我们自定义的credential也是要效验账号密码的,所以直接可以继承UsernamePasswordCredential,然后在添加一个captcha属性即可
package com.pansky.cas.config;

import org.apereo.cas.authentication.UsernamePasswordCredential;

import javax.validation.constraints.Size;

/**
 * 描述:
 * 自定义Credential
 *
 * @author Xue_Pan
 * @create 2019-01-22 16:28
 */
public class UsernamePasswordCaptchaCredential extends UsernamePasswordCredential{

    @Size(min = 1, message = "验证码不能为空")
    private String captcha;

    public String getCaptcha() {
        return captcha;
    }

    public void setCaptcha(String captcha) {
        this.captcha = captcha;
    }
}
3.2.3 重写登录webflow配置类
为了将我们自己写的credential加进去,我们需要将原本默认的webflow登录配置类(DefaultLoginWebflowConfigurer)替换掉。
package com.pansky.cas.config;

import org.apereo.cas.authentication.RememberMeUsernamePasswordCredential;
import org.apereo.cas.configuration.CasConfigurationProperties;
import org.apereo.cas.web.flow.CasWebflowConstants;
import org.apereo.cas.web.flow.configurer.DefaultLoginWebflowConfigurer;
import org.springframework.context.ApplicationContext;
import org.springframework.webflow.definition.registry.FlowDefinitionRegistry;
import org.springframework.webflow.engine.Flow;
import org.springframework.webflow.engine.ViewState;
import org.springframework.webflow.engine.builder.BinderConfiguration;
import org.springframework.webflow.engine.builder.support.FlowBuilderServices;

/**
 * 描述:
 * 自定义的webflow登录配置类,为了将我们写的证书类注入
 *
 * @author Xue_Pan
 * @create 2019-01-22 16:44
 */
public class CaptchaDefaultLoginWebflowConfigurer extends DefaultLoginWebflowConfigurer {

    /**
     *
     */
    public CaptchaDefaultLoginWebflowConfigurer(FlowBuilderServices flowBuilderServices, FlowDefinitionRegistry flowDefinitionRegistry, ApplicationContext applicationContext, CasConfigurationProperties casProperties) {
        super(flowBuilderServices, flowDefinitionRegistry, applicationContext, casProperties);
    }

    /**
     * 当没有记住我的时候,就放入我们自定义的类UsernamePasswordCaptchaCredential.class
     * @param flow
     */
    @Override
    protected void createRememberMeAuthnWebflowConfig(Flow flow) {
        if (casProperties.getTicket().getTgt().getRememberMe().isEnabled()) {
            createFlowVariable(flow, CasWebflowConstants.VAR_ID_CREDENTIAL, RememberMeUsernamePasswordCredential.class);
            final ViewState state = getState(flow, CasWebflowConstants.STATE_ID_VIEW_LOGIN_FORM, ViewState.class);
            final BinderConfiguration cfg = getViewStateBinderConfiguration(state);
            cfg.addBinding(new BinderConfiguration.Binding("rememberMe", null, false));
        } else {
            final ViewState state = getState(flow, CasWebflowConstants.STATE_ID_VIEW_LOGIN_FORM, ViewState.class);
            final BinderConfiguration cfg = getViewStateBinderConfiguration(state);
            //绑定属性 captcha
            cfg.addBinding(new BinderConfiguration.Binding("captcha", null, false));
            createFlowVariable(flow, CasWebflowConstants.VAR_ID_CREDENTIAL, UsernamePasswordCaptchaCredential.class);
        }
    }
}
3.2.4 将登录配置类注入spring容器
将我们自己的配置类放到容器中名字使用原来的名字
package com.pansky.cas.config;

import org.apereo.cas.configuration.CasConfigurationProperties;
import org.apereo.cas.web.flow.CasWebflowConfigurer;
import org.apereo.cas.web.flow.configurer.DefaultLoginWebflowConfigurer;
import org.springframework.beans.factory.annotation.Autowired;
import org.springframework.context.ApplicationContext;
import org.springframework.context.annotation.Bean;
import org.springframework.context.annotation.Configuration;
import org.springframework.webflow.definition.registry.FlowDefinitionRegistry;
import org.springframework.webflow.engine.builder.support.FlowBuilderServices;

/**
 * 描述:
 * bean的注入配置类
 *
 * @author Xue_Pan
 * @create 2019-01-22 17:02
 */
@Configuration
public class RegisterBeanConfig {

    @Autowired
    private FlowDefinitionRegistry logoutFlowRegistry;

    /**
     * 使用自己的登录webflow配置替换cas的,可以保证使用我们自己创建credential
     * @param flowBuilderServices
     * @param flowDefinitionRegistry
     * @param applicationContext
     * @param casProperties
     * @return
     */
    @Bean("defaultLoginWebflowConfigurer")
    public CasWebflowConfigurer captchaDefaultLoginWebflowConfigurer(
        FlowBuilderServices flowBuilderServices,
        FlowDefinitionRegistry flowDefinitionRegistry,
        ApplicationContext applicationContext,
        CasConfigurationProperties casProperties){
        DefaultLoginWebflowConfigurer defaultLoginWebflowConfigurer = new DefaultLoginWebflowConfigurer(flowBuilderServices, flowDefinitionRegistry, applicationContext, casProperties);
        defaultLoginWebflowConfigurer.setLogoutFlowDefinitionRegistry(logoutFlowRegistry);
        defaultLoginWebflowConfigurer.initialize();
        return defaultLoginWebflowConfigurer;
    }
}
再将配置类添加进META-INF/spring.factories中
org.springframework.boot.autoconfigure.EnableAutoConfiguration=\
  org.apereo.cas.config.CasEmbeddedContainerTomcatConfiguration,\
  org.apereo.cas.config.CasEmbeddedContainerTomcatFiltersConfiguration,\
  com.pansky.cas.config.MyAuthenticationHandlerPlanConfigurer,\
  com.pansky.cas.config.RegisterBeanConfig
3.2.5 重写登录效验逻辑
前面我们曾经自定义过登录效验,现在就去将验证码的效验逻辑加进去,并且使用mybatis从数据库中查找用户。
文档信息
- 本文作者:chayedankase
- 本文链接:https://chayedankase.github.io/2019/01/04/SSO-CAS/
- 版权声明:自由转载-非商用-非衍生-保持署名(创意共享3.0许可证)